PHP Tutorial
- PHP Tutorial
- Install PHP
- PHP Code
- PHP Echo and print
- PHP Variable
- PHP Variable Scope
- PHP $ and $$
- PHP Constants
- PHP Data Types
- PHP Operators
- PHP Comments
Control Statement
- PHP If else
- PHP Switch
- PHP For Loop
- PHP foreach loop
- PHP While Loop
- PHP Do While Loop
- PHP Break
- PHP Continue
PHP Functions
- PHP Functions
- Parameterized Function
- PHP Call By Value and reference
- PHP Default Arguments
- PHP Variable Arguments
- PHP Recursive Function
PHP Arrays
PHP Strings
PHP Math
PHP Form
PHP Include
State Management
PHP File
Upload Download
PHP OOPs Concepts
- OOPs Concepts
- OOPs Abstract Class
- OOPs Abstraction
- OOPs Access Specifiers
- OOPs Const Keyword
- OOPs Constructor and destructor
- Encapsulation
- Final Keyword
- OOPs Functions
- OOPs Inheritance
- OOPs Interface
- OOPs Overloading
- OOPs Type Hinting
PHP MySQLi
- MySQLi CONNECT
- MySQLi CREATE DB
- MySQLi CREATE Table
- MySQLi INSERT
- MySQLi UPDATE
- MySQLi DELETE
- MySQLi SELECT
- MySQLi Order by
PHP Topics
- Compound Types
- is_null() Function
- Special Types
- Inheritance Task
- Special Types
- MVC Architecture
- PHP vs. JavaScript
- PHP vs. HTML
- PHP vs. Node.js
- PHP vs Python
- PHP PDO
- Top 10 PHP frameworks
- phpMyAdmin
- Count All Array Elements
- Create Newline
- Get Current Page URL
PHP Mail
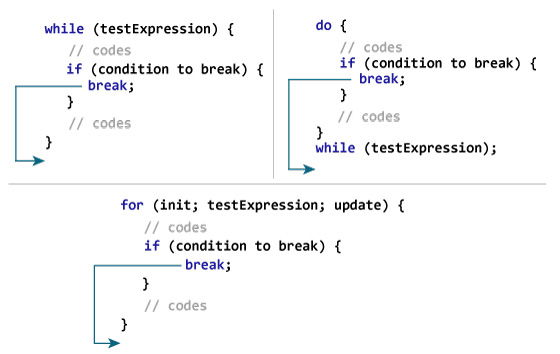
The PHP continue statement is used to continue the loop. It continues the current flow of the program and skips the remaining code at the specified condition.
The continue statement is used within looping and switch control structure when you immediately jump to the next iteration.
The continue statement can be used with all types of loops such as – for, while, do-while, and foreach loop. The continue statement allows the user to skip the execution of the code for the specified condition.
Syntax
The syntax for the continue statement is given below:
- jump-statement;
- continue;
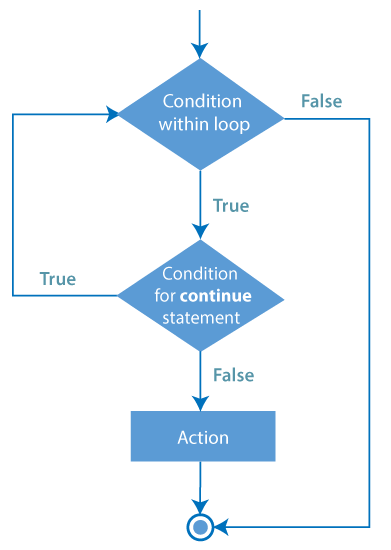
Flowchart:
PHP Continue Example with for loop
Example
In the following example, we will print only those values of i and j that are same and skip others.
<?php
    //outer loop
    for ($i =1; $i<=3; $i++) {
        //inner loop
        for ($j=1; $j<=3; $j++) {
            if (!($i == $j) ) {
                continue;       //skip when i and j does not have same values
            }
            echo $i.$j;
            echo "</br>";
        }
    }
?>
Output:
11
22
33
PHP continue Example in while loop
Example
In the following example, we will print the even numbers between 1 to 20.
<?php
    //php program to demonstrate the use of continue statement

    echo "Even numbers between 1 to 20: </br>";
    $i = 1;
    while ($i<=20) {
        if ($i %2 == 1) {
            $i++;
            continue;   //here it will skip rest of statements
        }
        echo $i;
        echo "</br>";
        $i++;
    }
?>
Output:
Even numbers between 1 to 20:
2
4
6
8
10
12
14
16
18
20
PHP continue Example with array of string
Example
The following example prints the value of array elements except those for which the specified condition is true and continue statement is used.
<?php
    $number = array ("One", "Two", "Three", "Stop", "Four");
    foreach ($number as $element) {
        if ($element == "Stop") {
            continue;
        }
        echo "$element </br>";
    }
?>
Output:
One
Two
Three
Four
PHP continue Example with optional argument
The continue statement accepts an optional numeric value, which is used accordingly. The numeric value describes how many nested structures it will exit.
Example
Look at the below example to understand it better:
<?php
    //outer loop
    for ($i =1; $i<=3; $i++) {
        //inner loop
        for ($j=1; $j<=3; $j++) {
            if (($i == $j) ) {      //skip when i and j have same values
                continue 1;     //exit only from inner for loop
            }
            echo $i.$j;
            echo "</br>";
        }
    }
?>
Output:
12
13
21
23
31
32