In this article, you will learn to extend a class with new functionality using extension functions.
Suppose, you need to extend a class with new functionality. In most programming languages, you either derive a new class or use some kind of design pattern to do this.
However, in Koltin, you can also use extension function to extend a class with new functionality. Basically, an extension function is a member function of a class that is defined outside the class.
For example, you need to use a method to the String class that returns a new string with first and last character removed; this method is not already available in String class. You can use extension function to accomplish this task.
Example: Remove First and Last Character of String
fun String.removeFirstLastChar(): String =  this.substring(1, this.length - 1)

fun main(args: Array<String>) {
    val myString= "Hello Everyone"
    val result = myString.removeFirstLastChar()
    println("First character is: $result")
}
When you run the program, the output will be:
First character is: ello Everyon
Here, an extension function removeFirstLastChar() is added to the String class.
The class name is the receiver type (String class in our example). The this keyword inside the extension function refers the receiver object.
If you need to integrate Kotlin on the top of Java project, you do not need to modify the whole code to Koltin. Just use extension functions to add functionalities.
In this article, you will learn to create data classes in Kotlin. You will also learn about requirements that data class must fulfill, and their standard functionalities.
There may arise a situation where you need to create a class solely to hold data. In such cases, you can mark the class as data to create a data class. For example,
data class Person(val name: String, var age: Int)
For this class, the compiler automatically generates:
copy() function, equals() and hashCode() pair, and toString() form of the primary constructor
componentN() functions
Before talking about these features in detail, let’s talk about requirements that a data class must fulfill.
Kotlin Data Class Requirements
Here are the requirements:
The primary constructor must have at least one parameter.
The parameters of the primary constructor must be marked as either val (read-only) or var (read-write).
The class cannot be open, abstract, inner or sealed.
The class may extend other classes or implement interfaces. If you are using Kotlin version before 1.1, the class can only implement interfaces.
Example: Kotlin Data Class
data class User(val name: String, val age: Int)

fun main(args: Array<String>) {
    val jack = User("jack", 29)
    println("name = ${jack.name}")
    println("age = ${jack.age}")
}
When you run the program, the output will be:
name = jack
age = 29
When you declare a data class, the compiler automatically generates several functions such as toString(), equals(), hashcode() etc behind the scenes. This helps to keep you code concise. Had you used Java, you would need to write a lot of boilerplate code.
Let’s use these functions:
Copying
For a data class, you can create a copy of an object with some of its properties different using copy() function. Here’s how it works:
data class User(val name: String, val age: Int)

fun main(args: Array<String>) {
    val u1 = User("John", 29)

    // using copy function to create an object
    val u2 = u1.copy(name = "Randy")

    println("u1: name = ${u1.name}, name = ${u1.age}")
    println("u2: name = ${u2.name}, name = ${u2.age}")
}
When you run the program, the output will be:
u1: name = John, name = 29
u2: name = Randy, name = 29
toString() method
The toString() function returns a string representation of the object.
data class User(val name: String, val age: Int)

fun main(args: Array<String>) {
    val u1 = User("John", 29)
    println(u1.toString())
}
When you run the program, the output will be:
User(name=John, age=29)
hashCode() and equals()
The hasCode() method returns hash code for the object. If two objects are equal, hashCode() produces the same integer result.
The equals() returns true if two objects are equal (has same hashCode()). If objects are not equal, equals() returns false.
data class User(val name: String, val age: Int)

fun main(args: Array<String>) {
    val u1 = User("John", 29)
    val u2 = u1.copy()
    val u3 = u1.copy(name = "Amanda")

    println("u1 hashcode = ${u1.hashCode()}")
    println("u2 hashcode = ${u2.hashCode()}")
    println("u3 hashcode = ${u3.hashCode()}")

    if (u1.equals(u2) == true)
        println("u1 is equal to u2.")
    else
        println("u1 is not equal to u2.")

    if (u1.equals(u3) == true)
        println("u1 is equal to u3.")
    else
        println("u1 is not equal to u3.")
}
When you run the program, the output will be:
u1 hashcode = 71750738
u2 hashcode = 71750738
u3 hashcode = 771732263
u1 is equal to u2.
u1 is not equal to u3.
Destructuring Declarations
You can destructure an object into a number of variables using destructing declaration. For example:
data class User(val name: String, val age: Int, val gender: String)

fun main(args: Array<String>) {
    val u1 = User("John", 29, "Male")

    val (name, age, gender) = u1
    println("name = $name")
    println("age = $age")
    println("gender = $gender")
}
When you run the program, the output will be:
name = John
age = 29
gender = Male
This was possible because the compiler generates componentN() functions all properties for a data class. For example:
data class User(val name: String, val age: Int, val gender: String)

fun main(args: Array<String>) {
    val u1 = User("John", 29, "Male")

    println(u1.component1())     // John
    println(u1.component2())     // 29
    println(u1.component3())     // "Male"
}
In this article, you will learn about constructors in Kotlin (both primary and secondary constructors) as well as initializer blocks with the help of examples.
A constructor is a concise way to initialize class properties.
It is a special member function that is called when an object is instantiated (created). However, how they work in Kotlin is slightly different.
In Kotlin, there are two constructors:
Primary constructor – concise way to initialize a class
Secondary constructor – allows you to put additional initialization logic
Primary Constructor
The primary constructor is part of the class header. Here’s an example:
class Person(val firstName: String, var age: Int) {
    // class body
}
The block of code surrounded by parentheses is the primary constructor: (val firstName: String, var age: Int).
The constructor declared two properties: firstName (read-only property as it’s declared using keyword val) and age (read-write property as it is declared with keyword var).
Example: Primary Constructor
fun main(args: Array<String>) {

    val person1 = Person("Joe", 25)

    println("First Name = ${person1.firstName}")
    println("Age = ${person1.age}")
}

class Person(val firstName: String, var age: Int) {

}
When you run the program, the output will be:
First Name = Joe
Age = 25
When the object of Person class is created, "Joe" and 25 values are passed as if Person is a function.
This initializes firstName and age properties of person1 object to "Joe" and 25 respectively.
There are other ways of using primary constructors.
Primary Constructor and Initializer Blocks
The primary constructor has a constrained syntax, and cannot contain any code.
To put the initilization code (not only code to initialize properties), initializer block is used. It is prefixed with init keyword. Let’s modify the above example with initializer block:
fun main(args: Array<String>) {
    val person1 = Person("joe", 25)
}

class Person(fName: String, personAge: Int) {
    val firstName: String
    var age: Int

    // initializer block
    init {
        firstName = fName.capitalize()
        age = personAge

        println("First Name = $firstName")
        println("Age = $age")
    }
}
When you run the program, the output will be:
First Name = Joe
Age = 25
Here, parameters fName and personAge inside the parenthesis accepts values "Joe" and 25 respectively when person1 object is created. However, fName and personAge are used without using var or val, and are not properties of the Person class.
The Person class has two properties firstName, and age are declared.
When person1 object is created, code inside initializer block is executed. The initializer block not only initializes its properties but also prints them.
Here is another way to perform the same task:
fun main(args: Array<String>) {
    val person1 = Person("joe", 25)
}

class Person(fName: String, personAge: Int) {
    val firstName = fName.capitalize()
    var age = personAge

    // initializer block
    init {
        println("First Name = $firstName")
        println("Age = $age")
    }
}
To distinguish the constructor parameter and property, different names are used (fName and firstName, and personAge and age). It’s more common to use _firstName and _age instead of completely different name for constructor parameters. For example:
class Person(_firstName: String, _age: Int) {
    val firstName = _firstName.capitalize()
    var age = _age

    // initializer block
    init {
        ... .. ...
    }
}
Default Value in Primary Constructor
You can provide default value to constructor parameters (similar to providing default arguments to functions). For example:
fun main(args: Array<String>) {

    println("person1 is instantiated")
    val person1 = Person("joe", 25)

    println("person2 is instantiated")
    val person2 = Person("Jack")

    println("person3 is instantiated")
    val person3 = Person()
}

class Person(_firstName: String = "UNKNOWN", _age: Int = 0) {
    val firstName = _firstName.capitalize()
    var age = _age

    // initializer block
    init {
        println("First Name = $firstName")
        println("Age = $age\n")
    }
}
When you run the program, the output will be:
First Name = Joe
Age = 25

person2 is instantiated
First Name = Jack
Age = 0

person3 is instantiated
First Name = UNKNOWN
Age = 0
Kotlin Secondary Constructor
In Kotlin, a class can also contain one or more secondary constructors. They are created using constructor keyword.
Secondary constructors are not that common in Kotlin. The most common use of secondary constructor comes up when you need to extend a class that provides multiple constructors that initialize the class in different ways. Be sure to check Kotlin Inheritance before you learn it.
Here’s how you can create a secondary constructor in Kotlin:
class Log {
    constructor(data: String) {
        // some code
    }
    constructor(data: String, numberOfData: Int) {
        // some code
    }
}
Here, the Log class has two secondary constructors, but no primary constructor.
fun main(args: Array<String>) {

    val p1 = AuthLog("Bad Password")
}

open class Log {
    var data: String = ""
    var numberOfData = 0
    constructor(_data: String) {

    }
    constructor(_data: String, _numberOfData: Int) {
        data = _data
        numberOfData = _numberOfData
        println("$data: $numberOfData times")
    }
}

class AuthLog: Log {
    constructor(_data: String): this("From AuthLog -> " + _data, 10) {
    }

    constructor(_data: String, _numberOfData: Int): super(_data, _numberOfData) {
    }
}
When you run the program, the output will be:
From AuthLog -> Bad Password: 10 times
Note: The secondary constructor must initialize the base class or delegate to another constructor (like in above example) if the class has no primary constructor.
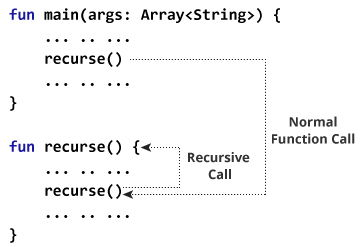
Here, the recurse() function is called from the body of recurse() function itself. Here’s how this program works:
Here, the recursive call continues forever causing infinite recursion.
To avoid infinite recursion, if…else (or similar approach) can be used where one branch makes the recursive call and other doesn’t.
Example: Find factorial of a Number using Recursion
fun main(args: Array<String>) {
    val number = 4
    val result: Long

    result = factorial(number)
    println("Factorial of $number = $result")
}

fun factorial(n: Int): Long {
    return if (n == 1) n.toLong() else n*factorial(n-1)
}
When you run the program, the output will be:
Factorial of 4 = 24
How this program works?
The recursive call of the factorial() function can be explained in the following figure:
Here are the steps involved:
factorial(4)              // 1st function call. Argument: 4
4*factorial(3)            // 2nd function call. Argument: 3
4*(3*factorial(2))        // 3rd function call. Argument: 2
4*(3*(2*factorial(1)))    // 4th function call. Argument: 1
4*(3*(2*1))
24
Kotlin Tail Recursion
Tail recursion is a generic concept rather than the feature of Kotlin language. Some programming languages including Kotlin use it to optimize recursive calls, whereas other languages (eg. Python) do not support them.
What is tail recursion?
In normal recursion, you perform all recursive calls first, and calculate the result from return values at last (as show in the above example). Hence, you don’t get result until all recursive calls are made.
In tail recursion, calculations are performed first, then recursive calls are executed (the recursive call passes the result of your current step to the next recursive call). This makes the recursive call equivalent to looping, and avoids the risk of stack overflow.
Condition for tail recursion
A recursive function is eligible for tail recursion if the function call to itself is the last operation it performs. For example,
Example 1: Not eligible for tail recursion because the function call to itself n*factorial(n-1) is not the last operation.
fun factorial(n: Int): Long {

    if (n == 1) {
        return n.toLong()
    } else {
        return n*factorial(n - 1)
    }
}
Example 2: Eligible for tail recursion because function call to itself fibonacci(n-1, a+b, a) is the last operation.
fun fibonacci(n: Int, a: Long, b: Long): Long {
    return if (n == 0) b else fibonacci(n-1, a+b, a)
}
To tell compiler to perform tail recursion in Kotlin, you need to mark the function with tailrec modifier.
Example: Tail Recursion
import java.math.BigInteger

fun main(args: Array<String>) {
    val n = 100
    val first = BigInteger("0")
    val second = BigInteger("1")

    println(fibonacci(n, first, second))
}

tailrec fun fibonacci(n: Int, a: BigInteger, b: BigInteger): BigInteger {
    return if (n == 0) a else fibonacci(n-1, b, a+b)
}
When you run the program, the output will be:
354224848179261915075
This program computes the 100th term of the Fibonacci series. Since, the output can be a very large integer, we have imported BigInteger class from Java standard library.
Here, the function fibonacci() is marked with tailrec modifier and the function is eligible for tail recursive call. Hence, the compiler optimizes the recursion in this case.
If you try to find the 20000th term (or any other big integer) of the Fibonacci series without using tail recursion, the compiler will throw java.lang.StackOverflowError exception. However, our program above works just fine. It’s because we have used tail recursion which uses efficient loop based version instead of traditional recursion.
Example: Factorial Using Tail Recursion
The example to compute factorial of a number in the above example (first example) cannot be optimized for tail recursion. Here’s a different program to perform the same task.
fun main(args: Array<String>) {
    val number = 5
    println("Factorial of $number = ${factorial(number)}")
}

tailrec fun factorial(n: Int, run: Int = 1): Long {
    return if (n == 1) run.toLong() else factorial(n-1, run*n)
}
When you run the program, the output will be:
Factorial of 5 = 120
The compiler can optimize the recursion in this program as the recursive function is eligible for tail recursion, and we have used tailrec modifier that tells compiler to optimize the recursion.