Kotlin Operator Overloading

In this article, you will learn about operator overloading (define how operator works for user defined types like objects) with the help of examples.

When you use operator in Kotlin, it’s corresponding member function is called. For example, expression a+b transforms to a.plus(b) under the hood.

fun main(args: Array<String>) {
    val a = 5
    val b = 10

    print(a.plus(b)) // print(a+b)
}

When you run the program, the output will be:

15

In fact, plus() function is overloaded to work with various Kotlin basic types and String.

// + operator for basic types
operator fun plus(other: Byte): Int
operator fun plus(other: Short): Int
operator fun plus(other: Int): Int
operator fun plus(other: Long): Long
operator fun plus(other: Float): Float
operator fun plus(other: Double): Double

// for string concatenation
operator fun String?.plus(other: Any?): String

You can also define how operator works for objects by overloading its corresponding function. For example, you need define how + operator works for objects by overloading plus() function.

Example: Overloading + Operator

fun main(args: Array<String>) {
    val p1 = Point(3, -8)
    val p2 = Point(2, 9)

    var sum = Point()
    sum = p1 + p2

    println("sum = (${sum.x}, ${sum.y})")
}

class Point(val x: Int = 0, val y: Int = 10) {

    // overloading plus function
    operator fun plus(p: Point) : Point {
        return Point(x + p.x, y + p.y)
    }
}

When you run the program, the output will be:

sum = (5, 1)

Here, the plus() function is marked with operator keyword to tell compiler that + operator is being overloaded.

The expression p1 + p2 is transformed to p1.plus(p2) under the hood.


Example: — Operator Overloading

In this example, you will learn to overload -- operator. The expression --a is transformed to a.dec() under the hood.

The dec() member function doesn’t take any arguments.

fun main(args: Array<String>) {
    var point = Point(3, -8)
    --point

    println("point = (${point.x}, ${point.y})")
}

class Point(var x: Int = 0, var y: Int = 10) {
    operator fun dec() = Point(--x, --y)
}

When you run the program, the ouput will be:

point = (2, -9)

Remember that,

operator fun dec() = Point(--x, --y)

is equivalent to

operator fun dec(): Point {
    return Point(--x, --y)
}

Few Important Points

1. When you overload operators, you should try to maintain the original spirit of the operator. For example,

fun main(args: Array<String>) {
    val p1 = Point(3, -8)
    val p2 = Point(2, 9)

    var sum = Point()
    sum = p1 + p2

    println("sum = (${sum.x}, ${sum.y})")
}

class Point(val x: Int = 0, val y: Int = 10) {

    // overloading plus function
    operator fun plus(p: Point) = Point(x - p.x, y - p.y)
}

Although the program above is technically correct, we have used + operator to subtract corresponding properties of two objects which made the program confusing.

2. Unlike languages like Scala, only a specific set of operators can be overloaded in Kotlin. Visit the page to learn about operators that can be overloaded in Kotlin and their corresponding member functions.

Kotlin Extension Function

In this article, you will learn to extend a class with new functionality using extension functions.

Suppose, you need to extend a class with new functionality. In most programming languages, you either derive a new class or use some kind of design pattern to do this.

However, in Koltin, you can also use extension function to extend a class with new functionality. Basically, an extension function is a member function of a class that is defined outside the class.

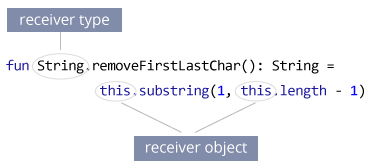
For example, you need to use a method to the String class that returns a new string with first and last character removed; this method is not already available in String class. You can use extension function to accomplish this task.


Example: Remove First and Last Character of String

fun String.removeFirstLastChar(): String =  this.substring(1, this.length - 1)

fun main(args: Array<String>) {
    val myString= "Hello Everyone"
    val result = myString.removeFirstLastChar()
    println("First character is: $result")
}

When you run the program, the output will be:

First character is: ello Everyon

Here, an extension function removeFirstLastChar() is added to the String class.

The class name is the receiver type (String class in our example). The this keyword inside the extension function refers the receiver object.

Kotlin extension function receiver type and obejct

If you need to integrate Kotlin on the top of Java project, you do not need to modify the whole code to Koltin. Just use extension functions to add functionalities.

Kotlin Companion Objects

In this article, you will learn to create and use companion objects in your Kotlin program with the help of examples.

Before taking about companion objects, let’s take an example to access members of a class.

class Person {
    fun callMe() = println("I'm called.")
}

fun main(args: Array<String>) {
    val p1 = Person()
    
    // calling callMe() method using object p1
    p1.callMe()    
}

Here, we created an object p1 of the Person class to call callMe() method. That’s how things normally work.

However, in Kotlin, you can also call callMe() method by using the class name, i.e, Person in this case. For that, you need to create a companion object by marking object declaration with companion keyword.


Example: Companion objects

class Person {
    companion object Test {
        fun callMe() = println("I'm called.")
    }
}

fun main(args: Array<String>) {
    Person.callMe()
}

When you run the program, the output will be:

I'm called.

In the program, Test object declaration is marked with keyword companion to create a companion object. Hence, it is possible to call callMe() method by using the name of the class as:

Person.callMe()

The name of the companion object is optional and can be omitted.

class Person {
    
    // name of the companion object is omitted
    companion object {
        fun callMe() = println("I'm called.")
    }
}

fun main(args: Array<String>) {
    Person.callMe()
}

If you are familiar with Java, you may relate companion objects with static methods (even though how they work internally is totally different).

The companion objects can access private members of the class. Hence, they can be used to implement the factory method patterns.

Kotlin Object Declarations and Expressions

In this article, you will learn about object declarations (singletons) and object expressions with the help of examples.

Object Declarations

Singleton is an object-oriented pattern where a class can have only one instance (object).

For example, you are working an application having SQL database backend. You want to create a connection pool to access the database while reusing the same connection for all clients. For this, you can create the connection through singleton class so that every client get the same connection.


Kotlin provides an easy way to create singletons using the object declaration feature. For that, object keyword is used.

object SingletonExample {
    ... .. ...
    // body of class
    ... .. ...
}

The above code combines a class declaration and a declaration of a single instance SingletonExample of the class.

An object declaration can contain properties, methods and so on. However, they are not allowed to have constructors (which makes sense). Why?

Similar to objects of a normal class, you can call methods and access properties by using the . notation.


Example: Object Declaration

object Test {
    private var a: Int = 0
    var b: Int = 1

    fun makeMe12(): Int {
        a = 12
        return a
    }
}

fun main(args: Array<String>) {
    val result: Int

    result = Test.makeMe12()

    println("b = ${Test.b}")
    println("result = $result")
}

When you run the program, the output will be:

b = 1
result = 12

Object declaration can inherit from classes and interfaces in a similar way like normal classes.


Singletons and Dependency Injection

Object declarations can be useful sometimes. However, they are not ideal in large software systems that interact with many other parts of the system.


Kotlin object Expressions

The object keyword can also be used to create objects of an anonymous class known as anonymous objects. They are used if you need to create an object of a slight modification of some class or interface without declaring a subclass for it. For example ,

window.addMouseListener(object : MouseAdapter() {
    override fun mouseClicked(e: MouseEvent) {
        // ...
    }

    override fun mouseEntered(e: MouseEvent) {
        // ...
    }
})

(The example is taken from official Kotlin docs page.)

Here, an anonymous object is declared extending MouseAdapter class.The program overrides two MouseAdapter methods: mouseClicked() and mouseEntered().

If necessary, you can assign a name to the anonymous object and store it in a variable. For example,

val obj = object : MouseAdapter() {
    override fun mouseClicked(e: MouseEvent) {
        // ...
    }

    override fun mouseEntered(e: MouseEvent) {
        // ...
    }
}

Example: Kotlin Object Expression

open class Person() {
    fun eat() = println("Eating food.")

    fun talk() = println("Talking with people.")

    open fun pray() = println("Praying god.")
}

fun main(args: Array<String>) {
    val atheist = object : Person() {
        override fun pray() = println("I don't pray. I am an atheist.")
    }

    atheist.eat()
    atheist.talk()
    atheist.pray()
}

When you run the program, the output will be:

Eating food.
Talking with people.
I don't pray. I am an atheist.

Here, anonymous object is stored in variable atheist which implements Person class with pray() method is overridden.


If you are implementing a class that has a constructor to declare an anonymous object, you need to pass appropriate constructor parameters. For example,

open class Person(name: String, age: Int) {

    init {
        println("name: $name, age: $age")
    }

    fun eat() = println("Eating food.")
    fun talk() = println("Talking with people.")
    open fun pray() = println("Praying god.")
}

fun main(args: Array<String>) {
    val atheist = object : Person("Jack", 29) {
        override fun pray() = println("I don't pray. I am an atheist.")
    }

    atheist.eat()
    atheist.talk()
    atheist.pray()
}

When you run the program, the output will be:

name: Jack, age: 29
Eating food.
Talking with people.
I don't pray. I am an atheist.

Kotlin Sealed Classes

In this article, you will learn about Sealed class, how they are created, and when to use them with the help of examples.

Sealed classes are used when a value can have only one of the types from a limited set (restricted hierarchies).


Before going into details about sealed classes, let’s explore what problem they solve. Let’s take an example (taken from official Kotlin website – Sealed classes article):

class Expr
class Const(val value: Int) : Expr
class Sum(val left: Expr, val right: Expr) : Expr

fun eval(e: Expr): Int =
        when (e) {
            is Const -> e.value
            is Sum -> eval(e.right) + eval(e.left)
            else ->
                throw IllegalArgumentException("Unknown expression")
        }

In the above program, the base class Expr has two derived classes Const (represents a number) and Sum (represents sum of two expressions). Here, it’s mandatory to use else branch for default condition in when expression.

Now, if you derive a new subclass from Expr class, the compiler won’t detect anything as else branch handles it which can lead to bugs. It would have been better if the compiler issued an error when we added a new subclass.

To solve this problem, you can use sealed class. As mentioned, sealed class restricts the possibility of creating subclasses. And, when you handle all subclasses of a sealed class in an when expression, it’s not necessary to use else branch.


To create a sealed class, sealed modifier is used. For example,

sealed class Expr

Example: Sealed Class

Here’s how you can solve the above problem using sealed class:

sealed class Expr
class Const(val value: Int) : Expr()
class Sum(val left: Expr, val right: Expr) : Expr()
object NotANumber : Expr()


fun eval(e: Expr): Int =
        when (e) {
            is Const -> e.value
            is Sum -> eval(e.right) + eval(e.left)
            NotANumber -> java.lang.Double.NaN
        }

As you can see, there is no else branch. If you derive a new subclass from Expr class, the compiler will complain unless the subclass is handled in the when expression.


Few Important Notes

  • All subclasses of a sealed class must be declared in the same file where sealed class is declared.
  • A sealed class is abstract by itself, and you cannot instantiate objects from it.
  • You cannot create non-private constructors of a sealed class; their constructors are private by default.

Difference Between Enum and Sealed Class

Enum class and sealed class are pretty similar. The set of values for an enum type is also restricted like a sealed class.

The only difference is that, enum can have just a single instance, whereas a subclass of a sealed class can have multiple instances.

Kotlin Data Class

In this article, you will learn to create data classes in Kotlin. You will also learn about requirements that data class must fulfill, and their standard functionalities.

There may arise a situation where you need to create a class solely to hold data. In such cases, you can mark the class as data to create a data class. For example,

data class Person(val name: String, var age: Int)

For this class, the compiler automatically generates:

  • copy() function, equals() and hashCode() pair, and toString() form of the primary constructor
  • componentN() functions

Before talking about these features in detail, let’s talk about requirements that a data class must fulfill.


Kotlin Data Class Requirements

Here are the requirements:

  • The primary constructor must have at least one parameter.
  • The parameters of the primary constructor must be marked as either val (read-only) or var (read-write).
  • The class cannot be open, abstract, inner or sealed.
  • The class may extend other classes or implement interfaces. If you are using Kotlin version before 1.1, the class can only implement interfaces.

Example: Kotlin Data Class

data class User(val name: String, val age: Int)

fun main(args: Array<String>) {
    val jack = User("jack", 29)
    println("name = ${jack.name}")
    println("age = ${jack.age}")
}

When you run the program, the output will be:

name = jack
age = 29

When you declare a data class, the compiler automatically generates several functions such as toString()equals()hashcode() etc behind the scenes. This helps to keep you code concise. Had you used Java, you would need to write a lot of boilerplate code.

Let’s use these functions:


Copying

For a data class, you can create a copy of an object with some of its properties different using copy() function. Here’s how it works:

data class User(val name: String, val age: Int)

fun main(args: Array<String>) {
    val u1 = User("John", 29)
   
    // using copy function to create an object
    val u2 = u1.copy(name = "Randy")

    println("u1: name = ${u1.name}, name = ${u1.age}")
    println("u2: name = ${u2.name}, name = ${u2.age}")
}

When you run the program, the output will be:

u1: name = John, name = 29
u2: name = Randy, name = 29

toString() method

The toString() function returns a string representation of the object.

data class User(val name: String, val age: Int)

fun main(args: Array<String>) {
    val u1 = User("John", 29)
    println(u1.toString())
}

When you run the program, the output will be:

User(name=John, age=29)

hashCode() and equals()

The hasCode() method returns hash code for the object. If two objects are equal, hashCode() produces the same integer result.

The equals() returns true if two objects are equal (has same hashCode()). If objects are not equal, equals() returns false

data class User(val name: String, val age: Int)

fun main(args: Array<String>) {
    val u1 = User("John", 29)
    val u2 = u1.copy()
    val u3 = u1.copy(name = "Amanda")

    println("u1 hashcode = ${u1.hashCode()}")
    println("u2 hashcode = ${u2.hashCode()}")
    println("u3 hashcode = ${u3.hashCode()}")

    if (u1.equals(u2) == true)
        println("u1 is equal to u2.")
    else
        println("u1 is not equal to u2.")

    if (u1.equals(u3) == true)
        println("u1 is equal to u3.")
    else
        println("u1 is not equal to u3.")
}

When you run the program, the output will be:

u1 hashcode = 71750738
u2 hashcode = 71750738
u3 hashcode = 771732263
u1 is equal to u2.
u1 is not equal to u3.

Destructuring Declarations

You can destructure an object into a number of variables using destructing declaration. For example:

data class User(val name: String, val age: Int, val gender: String)

fun main(args: Array<String>) {
    val u1 = User("John", 29, "Male")

    val (name, age, gender) = u1
    println("name = $name")
    println("age = $age")
    println("gender = $gender")
}

When you run the program, the output will be:

name = John
age = 29
gender = Male

This was possible because the compiler generates componentN() functions all properties for a data class. For example:

data class User(val name: String, val age: Int, val gender: String)

fun main(args: Array<String>) {
    val u1 = User("John", 29, "Male")

    println(u1.component1())     // John
    println(u1.component2())     // 29  
    println(u1.component3())     // "Male"
}

When you run the program, the output will be:

John
29
Male

Kotlin Nested and Inner Class

In this article, you will learn to work with nested and inner classes with the help of examples.

Kotlin Nested Class

Similar like Java, Kotlin allows you to define a class within another class known as nested class.

class Outer {
    ... .. ...
    class Nested {
        ... .. ...
    }
}

Since Nested class is a member of its enclosing class Outer, you can use . notation to access Nested class and its members.


Example: Kotlin Nested Class

class Outer {

    val a = "Outside Nested class."

    class Nested {
        val b = "Inside Nested class."
        fun callMe() = "Function call from inside Nested class."
    }
}

fun main(args: Array<String>) {
    // accessing member of Nested class
    println(Outer.Nested().b)

    // creating object of Nested class
    val nested = Outer.Nested()
    println(nested.callMe())
}

When you run the program, the output will be:

Inside Nested class.
Function call from inside Nested class.

For Java Users

The nested class in Kotlin is similar to static nested class in Java.

In Java, when you declare a class inside another class, it becomes an inner class by default. However in Kotlin, you need to use inner modifier to create an inner class which we will discuss next.


Kotlin Inner Class

The nested classes in Kotlin do not have access to the outer class instance. For example,

class Outer {
    val foo = "Outside Nested class."

    class Nested {
        // Error! cannot access member of outer class.
        fun callMe() = foo
    }
}

fun main(args: Array<String>) {

    val outer = Outer()
    println(outer.Nested().callMe())
}

The above code won’t compile because we tried to access foo property of Outer class from inside Nested class.

In order to solve this issue, you need to mark the nested class with inner to create an inner class. Inner classes carry a reference to an outer class, and can access outer class members.


Example: Kotlin Inner Class

class Outer {

    val a = "Outside Nested class."

    inner class Inner {
        fun callMe() = a
    }
}

fun main(args: Array<String>) {

    val outer = Outer()
    println("Using outer object: ${outer.Inner().callMe()}")

    val inner = Outer().Inner()
    println("Using inner object: ${inner.callMe()}")
}

When you run the program, the output will be:

Using outer object: Outside Nested class.
Using inner object: Outside Nested class.

Kotlin Interfaces

In this article, you will learn about interfaces and how to implement it in Kotlin with the help of examples.

Kotlin interfaces are similar to interfaces in Java 8. They can contain definitions of abstract methods as well as implementations of non-abstract methods. However, they cannot contain any state.

Meaning, interface may have property but it needs to be abstract or has to provide accessor implementations.


Abstract classes in Kotlin are similar to interface with one important difference. It’s not mandatory for properties of an abstract class to be abstract or provide accessor implementations.


How to define an interface?

Keyword interface is used to define interfaces in Kotlin. For example,

interface MyInterface {

    var test: String   // abstract property

    fun foo()          // abstract method
    fun hello() = "Hello there" // method with default implementation
}

Here,

  • an interface MyInterface is created.
  • the interface has an abstract property test and an abstract method foo().
  • the interface also has a non-abstract method hello().

How to implement interface?

Here’s how a class or object can implement the interface:

interface MyInterface {

    val test: Int   // abstract property

    fun foo() : String   // abstract method (returns String)
    fun hello() {   // method with default implementation
        // body (optional)
    }
}

class InterfaceImp : MyInterface {

    override val test: Int = 25
    override fun foo() = "Lol"

    // other code
}

Here, a class InterfaceImp implements the MyInterface interface.

The class overrides abstract members (test property and foo() method) of the interface.


Example: How interface works?

interface MyInterface {

    val test: Int

    fun foo() : String

    fun hello() {
        println("Hello there, pal!")
    }
}

class InterfaceImp : MyInterface {

    override val test: Int = 25
    override fun foo() = "Lol"

}

fun main(args: Array<String>) {
    val obj = InterfaceImp()

    println("test = ${obj.test}")
    print("Calling hello(): ")

    obj.hello()

    print("Calling and printing foo(): ")
    println(obj.foo())
}

When you run the program, the output will be:

test = 25
Calling hello(): Hello there, pal!
Calling and printing foo(): Lol

As mentioned above, an interface may also have a property that provide accessor implementation. For example,

interface MyInterface {

    // property with implementation
    val prop: Int
        get() = 23
}

class InterfaceImp : MyInterface {
    // class body
}

fun main(args: Array<String>) {
    val obj = InterfaceImp()

    println(obj.prop)
}

When you run the program, the output will be:

23

Here, prop is not abstract. However, it’s valid inside the interface because it provides implementation for accessor.

However, you cannot do something like val prop: Int = 23 inside the interface.


Implementing Two or More Interfaces in a Class

Kotlin does not allow true multiple inheritance. However, it’s possible to implement two or more interfaces in a single class. For example,

interface A {

    fun callMe() {
        println("From interface A")
    }
}

interface B  {
    fun callMeToo() {
        println("From interface B")
    }
}

// implements two interfaces A and B
class Child: A, B

fun main(args: Array<String>) {
    val obj = Child()

    obj.callMe()
    obj.callMeToo()
}

When you run the program, the output will be:

From interface A
From interface B

Resolving overriding conflicts (Multiple Interface)

Suppose, two interfaces(A and B) have a non-abstract method with the same name (let’s say callMe() method). You implemented these two interfaces in a class (let’s say C). Now, if you call the callMe() method using the object of class C, compiler will throw error. For example,

interface A {

    fun callMe() {
        println("From interface A")
    }
}

interface B  {
    fun callMe() {
        println("From interface B")
    }
}

class Child: A, B 

fun main(args: Array<String>) {
    val obj = Child()

    obj.callMe()
}

Here’s the error:

Error:(14, 1) Kotlin: Class 'C' must override public open fun callMe(): Unit defined in A because it inherits multiple interface methods of it

To solve this issue, you need to provide your own implementation. Here’s how:

interface A {

    fun callMe() {
        println("From interface A")
    }
}

interface B  {
    fun callMe() {
        println("From interface B")
    }
}

class C: A, B {
    override fun callMe() {
        super<A>.callMe()
        super<B>.callMe()
    }
}

fun main(args: Array<String>) {
    val obj = C()

    obj.callMe()
}

Now when you run the program, the output will be:

From interface A
From interface B

Here, explicit implementation of callMe() method is provided in class C.

class C: A, B {
    override fun callMe() {
        super<A>.callMe()
        super<B>.callMe()
    }
}

The statement super<A>.callMe() calls the callMe() method of class A. Similarly, super<B>.callMe() calls the callMe() method of class B.

Kotlin Abstract Class

In this article, you will learn about abstract class and how to implement it in Kotlin (with the help of examples).

Like Java, abstract keyword is used to declare abstract classes in Kotlin. An abstract class cannot be instantiated (you cannot create objects of an abstract class). However, you can inherit subclasses from can them.

The members (properties and methods) of an abstract class are non-abstract unless you explictly use abstract keyword to make them abstract. Let’s take an example:

abstract class Person {
    
    var age: Int = 40

    fun displaySSN(ssn: Int) {
        println("My SSN is $ssn.")
    }

    abstract fun displayJob(description: String)
}

Here,

  • an abstract class Person is created. You cannot create objects of the class.
  • the class has a non-abstract property age and a non-abstract method displaySSN(). If you need to override these members in the subclass, they should be marked with open keyword.
  • The class has an abstract method displayJob(). It doesn’t have any implementation and must be overridden in its subclasses.

Note: Abstract classes are always open. You do not need to explicitly use open keyword to inherit subclasses from them.


Example: Kotlin Abstract Class and Method

abstract class Person(name: String) {

    init {
        println("My name is $name.")
    }

    fun displaySSN(ssn: Int) {
        println("My SSN is $ssn.")
    }

    abstract fun displayJob(description: String)
}

class Teacher(name: String): Person(name) {

    override fun displayJob(description: String) {
        println(description)
    }
}

fun main(args: Array<String>) {
    val jack = Teacher("Jack Smith")
    jack.displayJob("I'm a mathematics teacher.")
    jack.displaySSN(23123)
}

When you run the program, the output will be:

My name is Jack Smith.
I'm a mathematics teacher.
My SSN is 23123.

Here, a class Teacher is derived from an abstract class Person.

An object jack of Teacher class is instantiated. We have passed "Jack Smith" as a parameter to the primary constructor while creating it. This executes the initializer block of the Person class.

Then, displayJob() method is called using jack object. Note, that the displayJob() method is declared abstract in the base class, and overridden in the derived class.

Finally, displaySSN() method is called using jack object. The method is non-abstract and declared in Person class (and not declared in Teacher class).


Kotlin interfaces are similar to abstract classes. However, interfaces cannot store state whereas abstract classes can.

Meaning, interface may have property but it needs to be abstract or has to provide accessor implementations. Whereas, it’s not mandatory for property of an abstract class to be abstract.

Kotlin Visibility Modifiers

In this article, you will learn about all 4 visibility modifiers in Kotlin and how they work in different scenarios.

Visibility modifiers are keywords that set the visibility (accessibility) of classes, objects, interface, constructors, functions, properties and their setters. (You cannot set visibility modifier of getters as they always take the same visibility as that of the property.)

In Kotlin Class and Objects article, you learned about visibility modifiers public and private in brief. You will learn about two more visibility modifiers protected and internal (as well as public and private) in detail.


Visibility Modifiers Inside Package

A package organizes a set of related functions, properties and classes, objects, and interfaces. Recommended reading: Kotlin Packages

ModifierDescription
publicdeclarations are visible everywhere
privatevisible inside the file containing the declaration
internalvisible inside the same module (a set of Kotlin files compiled together)
protectednot available for packages (used for subclasses)

Note: If visibility modifier is not specified, it is public by default.

Let’s take an example:

// file name: hello.kt

package test

fun function1() {}   // public by default and visible everywhere

private fun function2() {}   // visible inside hello.kt

internal fun function3() {}   // visible inside the same module

var name = "Foo"   // visible everywhere
    get() = field   // visible inside hello.kt (same as its property)
    private set(value) {   // visible inside hello.kt
        field = value
    }

private class class1 {}   // visible inside hello.kt

Visibility Modifiers Inside Classes and Interfaces

Here’s how visibility modifiers works for members (functions, properties) declared inside a class:

ModifierDescription
publicvisible to any client who can see the declaring class
privatevisible inside the class only
protectedvisible inside the class and its subclasses
internalvisible to any client inside the module that can see the declaring class

Note: If you override a protected member in the derived class without specifying its visibility, its visibility will also be protected.

Let’s take an example:

open class Base() {
    var a = 1                 // public by default
    private var b = 2         // private to Base class
    protected open val c = 3  // visible to the Base and the Derived class
    internal val d = 4        // visible inside the same module

    protected fun e() { }     // visible to the Base and the Derived class
}

class Derived: Base() {

    // a, c, d, and e() of the Base class are visible
    // b is not visible

    override val c = 9        // c is protected
}

fun main(args: Array<String>) {
    val base = Base()

    // base.a and base.d are visible
    // base.b, base.c and base.e() are not visible

    val derived = Derived()
    // derived.c is not visible
}

Changing Visibility of a Constructor

By default, the visibility of a constructor is public. However, you can change it. For that, you need to explicitly add constructor keyword.

The constructor is public by default in the example below:

class Test(val a: Int) {
    // code
}

Here’s how you can change its visibility.

class Test private constructor(val a: Int) {
    // code
}

Here the constructor is private.