Kotlin inheritance

Inheritance is one of the key features of object-oriented programming. It allows user to create a new class (derived class) from an existing class (base class).

The derived class inherits all the features from the base class and can have additional features of its own.

Before going into details about Kotlin inheritance, we recommend you to check these two articles:

  • Kotlin Class and Objects
  • Kotlin Primary Constructor

Why inheritance?

Suppose, in your application, you want three characters – a math teacher, a footballer and a businessman.

Since, all of the characters are persons, they can walk and talk. However, they also have some special skills. A math teacher can teach math, a footballer can play football and a businessman can run a business.

You can individually create three classes who can walk, talk and perform their special skill.

Example of classes sharing same features without the use of inheritance.

In each of the classes, you would be copying the same code for walk and talk for each character.

If you want to add a new feature – eat, you need to implement the same code for each character. This can easily become error prone (when copying) and duplicate codes.

It would be a lot easier if we had a Person class with basic features like talk, walk, eat, sleep, and add special skills to those features as per our characters. This is done using inheritance.
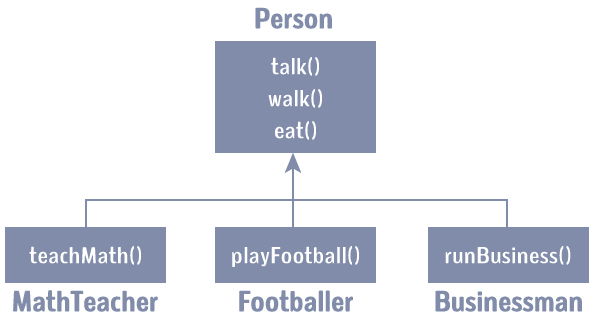
Example of inheritance in OOP

Using inheritance, now you don’t implement the same code for walk()talk() and eat() for each class. You just need to inherit them.

So, for MathTeacher (derived class), you inherit all features of a Person (base class) and add a new feature teachMath(). Likewise, for the Footballer class, you inherit all the features of the Person class and add a new feature playFootball() and so on.

This makes your code cleaner, understandable and extendable.

It is important to remember: When working with inheritance, each derived class should satisfy the condition whether it “is a” base class or not. In the example above, MathTeacher is a PersonFootballer is a Person. You cannot have something like, Businessman is a Business.


Kotlin inheritance

Let’s try to implement the above discussion in code:

open class Person(age: Int) {
    // code for eating, talking, walking
}

class MathTeacher(age: Int): Person(age) {
    // other features of math teacher
}

class Footballer(age: Int): Person(age) {
    // other features of footballer
}

class Businessman(age: Int): Person(age) {
    // other features of businessman
}

Here, Person is a base class, and classes MathTeacherFootballer, and Businessman are derived from the Person class.

Notice, the keyword open before the base class, Person. It’s important.

By default, classes in Kotlin are final. If you are familiar with Java, you know that a final class cannot be subclassed. By using the open annotation on a class, compiler allows you to derive new classes from it.


Example: Kotlin Inheritance

open class Person(age: Int, name: String) {
    init {
        println("My name is $name.")
        println("My age is $age")
    }
}

class MathTeacher(age: Int, name: String): Person(age, name) {

    fun teachMaths() {
        println("I teach in primary school.")
    }
}

class Footballer(age: Int, name: String): Person(age, name) {
    fun playFootball() {
        println("I play for LA Galaxy.")
    }
}

fun main(args: Array<String>) {
    val t1 = MathTeacher(25, "Jack")
    t1.teachMaths()

    println()

    val f1 = Footballer(29, "Christiano")
    f1.playFootball()
}

When you run the program, the output will be:

My name is Jack.
My age is 25
I teach in primary school.

My name is Cristiano.
My age is 29
I play for LA Galaxy.

Here, two classes MathTeacher and Footballer are derived from the Person class.

The primary constructor of the Person class declared two properties: age and name, and it has an initializer block. The initilizer block (and member functions) of the base class Person can be accessed by the objects of derived classes (MathTeacher and Footballer).

Derived classes MathTeacher and Footballer have their own member functions teachMaths() and playFootball() respectively. These functions are accessible only from the objects of their respective class.


When the object t1 of MathTeacher class is created,

val t1 = MathTeacher(25, "Jack")

The parameters are passed to the primary constructor. In Kotlin, init block is called when the object is created. Since, MathTeacher is derived from Person class, it looks for initializer block in the base class (Person) and executes it. If the MathTeacher had init block, the compiler would have also executed the init block of the derived class.

Next, the teachMaths() function for object t1 is called using t1.teachMaths() statement.

The program works similarly when object f1 of Footballer class is created. It executes the init block of the base class. Then, the playFootball() method of Footballer class is called using statement f1.playFootball().


Important Notes: Kotlin Inheritance

  • If the class has a primary constructor, the base must be initialized using the parameters of the primary constructor. In the above program, both derived classes have two parameters age and name, and both these parameters are initialized in primary constructor in the base class.

    Here’s another example:open class Person(age: Int, name: String) { // some code } class Footballer(age: Int, name: String, club: String): Person(age, name) { init { println("Football player $name of age $age and plays for $club.") } fun playFootball() { println("I am playing football.") } } fun main(args: Array<String>) { val f1 = Footballer(29, "Cristiano", "LA Galaxy") } Here the primary constructor of the derived class has 3 parameters, and the base class has 2 parameters. Note that, both parameters of the base class are initialized.
     
  • In case of no primary constructor, each base class has to initialize the base (using super keyword), or delegate to another constructor which does that. For example,fun main(args: Array<String>) { val p1 = AuthLog("Bad Password") } open class Log { var data: String = "" var numberOfData = 0 constructor(_data: String) { } constructor(_data: String, _numberOfData: Int) { data = _data numberOfData = _numberOfData println("$data: $numberOfData times") } } class AuthLog: Log { constructor(_data: String): this("From AuthLog -> + $_data", 10) { } constructor(_data: String, _numberOfData: Int): super(_data, _numberOfData) { } }To learn more on how this program works, visit Kotlin Secondary Constructor.

Overriding Member Functions and Properties

If the base class and the derived class contains a member function (or property) with the same name, you can need to override the member function of the derived class using override keyword, and use open keyword for the member function of the base class.


Example: Overriding Member Function

// Empty primary constructor
open class Person() {
    open fun displayAge(age: Int) {
        println("My age is $age.")
    }
}

class Girl: Person() {

    override fun displayAge(age: Int) {
        println("My fake age is ${age - 5}.")
    }
}

fun main(args: Array<String>) {
    val girl = Girl()
    girl.displayAge(31)
}

When you run the program, the output will be:

My fake age is 26.

Here, girl.displayAge(31) calls the displayAge() method of the derived class Girl.


You can override property of the base class in similar way.

Visit how Kotlin getters and setters work in Kotlin before you check the example below.

// Empty primary constructor
open class Person() {
    open var age: Int = 0
        get() = field

        set(value) {
            field = value
        }
}

class Girl: Person() {

    override var age: Int = 0
        get() = field

        set(value) {
            field = value - 5
        }
}

fun main(args: Array<String>) {

    val girl = Girl()
    girl.age = 31
    println("My fake age is ${girl.age}.")
}

When you run the program, the output will be:

My fake age is 26.

As you can see, we have used override and open keywords for age property in derived class and base class respectively.


Calling Members of Base Class from Derived Class

You can call functions (and access properties) of the base class from a derived class using super keyword. Here’s how:

open class Person() {
    open fun displayAge(age: Int) {
        println("My actual age is $age.")
    }
}

class Girl: Person() {

    override fun displayAge(age: Int) {

        // calling function of base class
        super.displayAge(age)
        
        println("My fake age is ${age - 5}.")
    }
}

fun main(args: Array<String>) {
    val girl = Girl()
    girl.displayAge(31)
}

When you run the program, the output will be:

My age is 31.
My fake age is 26.

Kotlin Getters and Setters

In this article, you will learn to use getters and setters in Kotlin with the help of an example.

Before you learn about getters and setter, be sure to check Kotlin class and objects.

In programming, getters are used for getting value of the property. Similarly, setters are used for setting value of the property.

In Kotlin, getters and setters are optional and are auto-generated if you do not create them in your program.


How getters and setters work?

The following code in Kotlin

class Person {
    var name: String = "defaultValue"
}

is equivalent to

class Person {
    var name: String = "defaultValue"

    // getter
    get() = field

    // setter
    set(value) {
        field = value
    }
}

When you instantiate object of the Person class and initialize the name property, it is passed to the setters parameter value and sets field to value.

val p = Person()
p.name = "jack"

Now, when you access name property of the object, you will get field because of the code get() = field.

println("${p.name}")

Here’s an working example:

fun main(args: Array<String>) {

    val p = Person()
    p.name = "jack"
    println("${p.name}")
}

class Person {
    var name: String = "defaultValue"

    get() = field

    set(value) {
        field = value
    }
}

When you run the program, the output will be:

jack

This is how getters and setters work by default. However, you can change value of the property (modify value) using getters and setters.


Example: Changing value of the property

fun main(args: Array<String>) {

    val maria = Girl()
    maria.actualAge = 15
    maria.age = 15
    println("Maria: actual age = ${maria.actualAge}")
    println("Maria: pretended age = ${maria.age}")

    val angela = Girl()
    angela.actualAge = 35
    angela.age = 35
    println("Angela: actual age = ${angela.actualAge}")
    println("Angela: pretended age = ${angela.age}")
}

class Girl {
    var age: Int = 0
    get() = field
    set(value) {
        field = if (value < 18)
            18
        else if (value >= 18 && value <= 30)
            value
        else
            value-3
    }

    var actualAge: Int = 0
}

When you run the program, the output will be:

Maria: actual age = 15
Maria: pretended age = 18
Angela: actual age = 35
Angela: pretended age = 32

Here, the actualAge property works as expected.

However, there is additional logic is setters to modify value of the age property.

Kotlin Constructors

In this article, you will learn about constructors in Kotlin (both primary and secondary constructors) as well as initializer blocks with the help of examples.

A constructor is a concise way to initialize class properties.

It is a special member function that is called when an object is instantiated (created). However, how they work in Kotlin is slightly different.

In Kotlin, there are two constructors:

  • Primary constructor – concise way to initialize a class
  • Secondary constructor – allows you to put additional initialization logic

Primary Constructor

The primary constructor is part of the class header. Here’s an example:

class Person(val firstName: String, var age: Int) {
    // class body
}

The block of code surrounded by parentheses is the primary constructor: (val firstName: String, var age: Int).

The constructor declared two properties: firstName (read-only property as it’s declared using keyword val) and age (read-write property as it is declared with keyword var).


Example: Primary Constructor

fun main(args: Array<String>) {

    val person1 = Person("Joe", 25)

    println("First Name = ${person1.firstName}")
    println("Age = ${person1.age}")
}

class Person(val firstName: String, var age: Int) {

}

When you run the program, the output will be:

First Name = Joe
Age = 25

When the object of Person class is created, "Joe" and 25 values are passed as if Person is a function.

This initializes firstName and age properties of person1 object to "Joe" and 25 respectively.


There are other ways of using primary constructors.


Primary Constructor and Initializer Blocks

The primary constructor has a constrained syntax, and cannot contain any code.

To put the initilization code (not only code to initialize properties), initializer block is used. It is prefixed with init keyword. Let’s modify the above example with initializer block:

fun main(args: Array<String>) {
    val person1 = Person("joe", 25)
}

class Person(fName: String, personAge: Int) {
    val firstName: String
    var age: Int

    // initializer block
    init {
        firstName = fName.capitalize()
        age = personAge

        println("First Name = $firstName")
        println("Age = $age")
    }
}

When you run the program, the output will be:

First Name = Joe
Age = 25

Here, parameters fName and personAge inside the parenthesis accepts values "Joe" and 25 respectively when person1 object is created. However, fName and personAge are used without using var or val, and are not properties of the Person class.

The Person class has two properties firstName, and age are declared.

When person1 object is created, code inside initializer block is executed. The initializer block not only initializes its properties but also prints them.


Here is another way to perform the same task:

fun main(args: Array<String>) {
    val person1 = Person("joe", 25)
}

class Person(fName: String, personAge: Int) {
    val firstName = fName.capitalize()
    var age = personAge

    // initializer block
    init {
        println("First Name = $firstName")
        println("Age = $age")
    }
}

To distinguish the constructor parameter and property, different names are used (fName and firstName, and personAge and age). It’s more common to use _firstName and _age instead of completely different name for constructor parameters. For example:

class Person(_firstName: String, _age: Int) {
    val firstName = _firstName.capitalize()
    var age = _age

    // initializer block
    init {
        ... .. ...
    }
}

Default Value in Primary Constructor

You can provide default value to constructor parameters (similar to providing default arguments to functions). For example:

fun main(args: Array<String>) {

    println("person1 is instantiated")
    val person1 = Person("joe", 25)

    println("person2 is instantiated")
    val person2 = Person("Jack")

    println("person3 is instantiated")
    val person3 = Person()
}

class Person(_firstName: String = "UNKNOWN", _age: Int = 0) {
    val firstName = _firstName.capitalize()
    var age = _age

    // initializer block
    init {
        println("First Name = $firstName")
        println("Age = $age\n")
    }
}

When you run the program, the output will be:

First Name = Joe
Age = 25

person2 is instantiated
First Name = Jack
Age = 0

person3 is instantiated
First Name = UNKNOWN
Age = 0

Kotlin Secondary Constructor

In Kotlin, a class can also contain one or more secondary constructors. They are created using constructor keyword.

Secondary constructors are not that common in Kotlin. The most common use of secondary constructor comes up when you need to extend a class that provides multiple constructors that initialize the class in different ways. Be sure to check Kotlin Inheritance before you learn it.

Here’s how you can create a secondary constructor in Kotlin:

class Log {
    constructor(data: String) {
        // some code
    }
    constructor(data: String, numberOfData: Int) {
        // some code
    }
}

Here, the Log class has two secondary constructors, but no primary constructor.

You can extend the class as:

class Log {
    constructor(data: String) {
        // code
    }
    constructor(data: String, numberOfData: Int) {
        // code
    }
}

class AuthLog: Log {
    constructor(data: String): super(data) {
        // code
    }
    constructor(data: String, numberOfData: Int): super(data, numberOfData) {
        // code
    }
}

Here, constructors of the derived class AuthLog calls the corresponding constructor of the base class Log. For that, super() is used.

Calling constructor of base class from derived class.

In Kotlin, you can also call a constructor from another constructor of the same class (like in Java) using this().

class AuthLog: Log {
    constructor(data: String): this(data, 10) {
        // code
    }
    constructor(data: String, numberOfData: Int): super(data, numberOfData) {
        // code
    }
}
Calling constructor from the same class.

Example: Kotlin Secondary Constructor

fun main(args: Array<String>) {

    val p1 = AuthLog("Bad Password")
}

open class Log {
    var data: String = ""
    var numberOfData = 0
    constructor(_data: String) {

    }
    constructor(_data: String, _numberOfData: Int) {
        data = _data
        numberOfData = _numberOfData
        println("$data: $numberOfData times")
    }
}

class AuthLog: Log {
    constructor(_data: String): this("From AuthLog -> " + _data, 10) {
    }

    constructor(_data: String, _numberOfData: Int): super(_data, _numberOfData) {
    }
}

When you run the program, the output will be:

From AuthLog -> Bad Password: 10 times

Note: The secondary constructor must initialize the base class or delegate to another constructor (like in above example) if the class has no primary constructor.

Kotlin Class and Objects

In this article, you’ll be introduced to Object-oriented programming in Kotlin. You’ll learn what a class is, how to create objects and use it in your program.

Kotlin supports both functional and object-oriented programming.

Kotlin supports features such as higher-order functionsfunction types and lambdas which makes it a great choice for working in functional programming style. You will learn about these concept in later chapters. This article will focus on object-oriented style of programming in Kotlin.


Object-oriented Programming (OOP)

In object-oriented style of programming, you can divide a complex problem into smaller sets by creating objects.

These objects share two characteristics:

  • state
  • behavior

Let’s take few examples:

  1. Lamp is an object
    • It can be in on or off state.
    • You can turn on and turn off lamp (behavior).
  2. Bicycle is an object
    • It has current gear, two wheels, number of gear etc. states.
    • It has braking, accelerating, changing gears etc. behavior.

You will learn about detail features of an object-oriented programming like: data encapsulationinheritance and polymorphism as we go on. This article will focus on the basics to keep things simple.


Kotlin Class

Before you create objects in Kotlin, you need to define a class.

A class is a blueprint for the object.

We can think of class as a sketch (prototype) of a house. It contains all the details about the floors, doors, windows etc. Based on these descriptions we build the house. House is the object.

Since, many houses can be made from the same description, we can create many objects from a class.


How to define a class in Kotlin?

To define a class in Kotlin, class keyword is used:

class ClassName {
    // property
    // member function
    ... .. ...
}

Here’s an example:

class Lamp {

    // property (data member)
    private var isOn: Boolean = false

    // member function
    fun turnOn() {
        isOn = true
    }

    // member function
    fun turnOff() {
        isOn = false
    }
}

Here, we defined a class named Lamp.

The class has one property isOn (defined in same way as variable), and two member functions turnOn() and turnOff().

In Kotlin, either the property must be initialized or must be declared abstract (Visit: Kotlin Abstract Class to learn more). In the above example, isOn property is initialized to false.


Classes, objects, properties, member function etc. can have visibility modifiers. For example, the isOn property is private. This means, the isOn property can be changed from only inside the Lamp class.

Other visibility modifiers are:

  • private – visible (can be accessed) from inside the class only.
  • public – visible everywhere.
  • protected – visible to the class and its subclass.
  • internal – any client inside the module can access them.

You will learn about protected and internal modifiers later in Kotlin visibility modifiers article.

If you do not specify the visibility modifier, it will be public by default.

In the above program, turnOn() and turnOff() member functions are public whereas, isOn property is private.


Kotlin Objects

When class is defined, only the specification for the object is defined; no memory or storage is allocated.

To access members defined within the class, you need to create objects. Let’s create objects of Lamp class.

class Lamp {

    // property (data member)
    private var isOn: Boolean = false

    // member function
    fun turnOn() {
        isOn = true
    }

    // member function
    fun turnOff() {
        isOn = false
    }
}

fun main(args: Array<String>) {

    val l1 = Lamp() // create l1 object of Lamp class
    val l2 = Lamp() // create l2 object of Lamp class
}

This program creates two objects l1 and l2 of class Lamp. The isOn property for both lamps l1 and l2 will be false.


How to access members?

You can access properties and member functions of a class by using . notation. For example,

l1.turnOn()

This statement calls turnOn() function for l1 object.

Let’s take another example:

l2.isOn = true

Here, we tried to assign true to isOn property of l2 object. Note that, isOn property is private, and if you try to access isOn from outside the class, an exception is thrown.


Example: Kotlin Class and Object

class Lamp {

    // property (data member)
    private var isOn: Boolean = false

    // member function
    fun turnOn() {
        isOn = true
    }

    // member function
    fun turnOff() {
        isOn = false
    }

    fun displayLightStatus(lamp: String) {
        if (isOn == true)
            println("$lamp lamp is on.")
        else
            println("$lamp lamp is off.")
    }
}

fun main(args: Array<String>) {

    val l1 = Lamp() // create l1 object of Lamp class
    val l2 = Lamp() // create l2 object of Lamp class

    l1.turnOn()
    l2.turnOff()

    l1.displayLightStatus("l1")
    l2.displayLightStatus("l2")
}

When you run the program, the output will be:

l1 Lamp is on.
l2 Lamp is off.

In the above program,

  • Lamp class is created.
  • The class has a property isOn and three member functions turnOn()turnOff() and displayLightStatus().
  • Two objects l1 and l2 of Lamp class are created in the main() function.
  • Here, turnOn() function is called using l1 object: l1.turnOn(). This method sets isOn instance variable of l1 object to true.
  • And, turnOff() function is called using l2 object: l1.turnOff(). This method sets isOff instance variable of l2 object to false.
  • Then, displayLightStatus() function is called for l1 and l2 objects which prints appropriate message depending on whether isOn property is true or false.

Notice that, the isOn property is initialized to false inside the class. When an object of the class is created, isOn property for the object is initialized to false automatically. So, it’s not necessary for l2 object to call turnOff() to set isOn property to false.

For example:

class Lamp {

    // property (data member)
    private var isOn: Boolean = false

    // member function
    fun turnOn() {
        isOn = true
    }

    // member function
    fun turnOff() {
        isOn = false
    }

    fun displayLightStatus() {
        if (isOn == true)
            println("lamp is on.")
        else
            println("lamp is off.")
    }
}

fun main(args: Array<String>) {

    val lamp = Lamp()
    lamp.displayLightStatus()
}

When you run the program, the output will be:

lamp is off.

Kotlin Recursion (Recursive Function) and Tail Recursion

In this article, you will learn to create recursive functions; a function that calls itself. Also, you will learn about tail recursive function.

A function that calls itself is known as recursive function. And, this technique is known as recursion.

A physical world example would be to place two parallel mirrors facing each other. Any object in between them would be reflected recursively.


How does recursion work in programming?

fun main(args: Array<String>) {
    ... .. ...
    recurse()
    ... .. ...
}

fun recurse() {
    ... .. ...
    recurse()
    ... .. ...
}

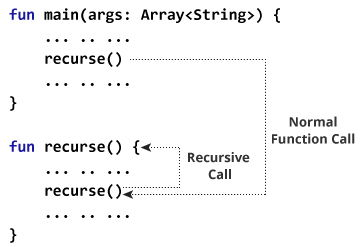
Here, the recurse() function is called from the body of recurse() function itself. Here’s how this program works:

Recursive function call in Kotlin

Here, the recursive call continues forever causing infinite recursion.

To avoid infinite recursion, if…else (or similar approach) can be used where one branch makes the recursive call and other doesn’t.


Example: Find factorial of a Number using Recursion

fun main(args: Array<String>) {
    val number = 4
    val result: Long

    result = factorial(number)
    println("Factorial of $number = $result")
}

fun factorial(n: Int): Long {
    return if (n == 1) n.toLong() else n*factorial(n-1)
}

When you run the program, the output will be:

Factorial of 4 = 24

How this program works?

The recursive call of the factorial() function can be explained in the following figure:

Here are the steps involved:

factorial(4)              // 1st function call. Argument: 4
4*factorial(3)            // 2nd function call. Argument: 3
4*(3*factorial(2))        // 3rd function call. Argument: 2
4*(3*(2*factorial(1)))    // 4th function call. Argument: 1 
4*(3*(2*1))                 
24

Kotlin Tail Recursion

Tail recursion is a generic concept rather than the feature of Kotlin language. Some programming languages including Kotlin use it to optimize recursive calls, whereas other languages (eg. Python) do not support them.


What is tail recursion?

In normal recursion, you perform all recursive calls first, and calculate the result from return values at last (as show in the above example). Hence, you don’t get result until all recursive calls are made.

In tail recursion, calculations are performed first, then recursive calls are executed (the recursive call passes the result of your current step to the next recursive call). This makes the recursive call equivalent to looping, and avoids the risk of stack overflow.


Condition for tail recursion

A recursive function is eligible for tail recursion if the function call to itself is the last operation it performs. For example,

Example 1: Not eligible for tail recursion because the function call to itself n*factorial(n-1) is not the last operation.

fun factorial(n: Int): Long {

    if (n == 1) {
        return n.toLong()
    } else {
        return n*factorial(n - 1)     
    }
}

Example 2: Eligible for tail recursion because function call to itself fibonacci(n-1, a+b, a) is the last operation.

fun fibonacci(n: Int, a: Long, b: Long): Long {
    return if (n == 0) b else fibonacci(n-1, a+b, a)
}

To tell compiler to perform tail recursion in Kotlin, you need to mark the function with tailrec modifier.


Example: Tail Recursion

import java.math.BigInteger

fun main(args: Array<String>) {
    val n = 100
    val first = BigInteger("0")
    val second = BigInteger("1")

    println(fibonacci(n, first, second))
}

tailrec fun fibonacci(n: Int, a: BigInteger, b: BigInteger): BigInteger {
    return if (n == 0) a else fibonacci(n-1, b, a+b)
}

When you run the program, the output will be:

354224848179261915075

This program computes the 100th term of the Fibonacci series. Since, the output can be a very large integer, we have imported BigInteger class from Java standard library.

Here, the function fibonacci() is marked with tailrec modifier and the function is eligible for tail recursive call. Hence, the compiler optimizes the recursion in this case.


If you try to find the 20000th term (or any other big integer) of the Fibonacci series without using tail recursion, the compiler will throw java.lang.StackOverflowError exception. However, our program above works just fine. It’s because we have used tail recursion which uses efficient loop based version instead of traditional recursion.


Example: Factorial Using Tail Recursion

The example to compute factorial of a number in the above example (first example) cannot be optimized for tail recursion. Here’s a different program to perform the same task.

fun main(args: Array<String>) {
    val number = 5
    println("Factorial of $number = ${factorial(number)}")
}

tailrec fun factorial(n: Int, run: Int = 1): Long {
    return if (n == 1) run.toLong() else factorial(n-1, run*n)
}

When you run the program, the output will be:

Factorial of 5 = 120

The compiler can optimize the recursion in this program as the recursive function is eligible for tail recursion, and we have used tailrec modifier that tells compiler to optimize the recursion.

Kotlin Default and Named Arguments

In this article, you will learn about default and named arguments with the help of examples.

Kotlin Default Argument

In Kotlin, you can provide default values to parameters in function definition.

If the function is called with arguments passed, those arguments are used as parameters. However, if the function is called without passing argument(s), default argument are used.


How default arguments works?

Case I: All arguments passed


Both arguments passed to the function

The function foo() takes two arguments. The arguments are provided with default values. However, foo() is called by passing both arguments in the above program. Hence, the default arguments are not used.

The value of letter and number will be 'x' and 2 respectively inside the foo() function.

Case II: All arguments are not passed


All arguments are not passed to the function

Here, only one (first) argument is passed to the foo() function. Hence, the first argument uses the value passed to the function. However, second argument number will take the default value since the second argument is not passed during function call.

The value of letter and number will be 'y' and 15 respectively inside the foo() function.

Case III: No argument is passed


No arguments passed to the function

Here, the foo() function is called without passing any argument. Hence, both arguments uses its default values.

The value of letter and number will be 'a' and 15 respectively inside the foo() function.


Example: Kotlin Default Argument

fun displayBorder(character: Char = '=', length: Int = 15) {
    for (i in 1..length) {
        print(character)
    }
}

fun main(args: Array<String>) {
    println("Output when no argument is passed:")
    displayBorder()

    println("\n\n'*' is used as a first argument.")
    println("Output when first argument is passed:")
    displayBorder('*')

    println("\n\n'*' is used as a first argument.")
    println("5 is used as a second argument.")
    println("Output when both arguments are passed:")
    displayBorder('*', 5)

}

When you run the program, the output will be:

Output when no argument is passed:
===============

'*' is used as a first argument.
Output when first argument is passed:
***************

'*' is used as a first argument.
5 is used as a second argument.
Output when both arguments are passed:
*****

Kotlin named argument

Before talking about named argument, let us consider a little modification of the above code:

fun displayBorder(character: Char = '=', length: Int = 15) {
    for (i in 1..length) {
        print(character)
    }
}

fun main(args: Array<String>) {
    displayBorder(5)
}

Here, we are trying to pass second argument to the displayBorder() function, and use default argument for first argument. However, this code will give use an error. It’s because the compiler thinks we are trying to provide 5 (Int value) to character (Char type).

To solve this situation, named arguments can be used. Here’ how:


Example: Kotlin named argument

fun displayBorder(character: Char = '=', length: Int = 15) {
    for (i in 1..length) {
        print(character)
    }
}

fun main(args: Array<String>) {
    displayBorder(length = 5)
}

When you run the program, the output will be:

=====

In the above program, we are using named argument (length = 5) specifying that the length parameter in the function definition should take this value (doesn’t matter the position of the argument).

Named Arguments in Kotlin

The first argument character uses the default value '=' in the program.

Kotlin Infix Function Call

In this article, you will learn to use infix notation to call a function in Kotlin (with the help of examples).

Before you learn how to create a function having infix notation, let’s explore two commonly used infix functions.

When you use || and && operations, the compiler look up for or and and functions respectively, and calls them under the hood.

These two functions support infix notation.


Example: Kotlin or & and function

fun main(args: Array<String>) {
    val a = true
    val b = false
    var result: Boolean

    result = a or b // a.or(b)
    println("result = $result")

    result = a and b // a.and(b)
    println("result = $result")
}

When you run the program, the output will be:

result = true
result = false

In the above program, a or b instead of a.or(b), and a and b instead of a.and(b) is used. It was possible because these two functions support infix notation.


How to create a function with infix notation?

You can make a function call in Kotlin using infix notation if the function

  • is a member function (or an extension function).
  • has only one single parameter.
  • is marked with infix keyword.

Example: User-defined Function With Infix Notation

class Structure() {

    infix fun createPyramid(rows: Int) {
        var k = 0
        for (i in 1..rows) {
            k = 0
            for (space in 1..rows-i) {
                print("  ")
            }
            while (k != 2*i-1) {
                print("* ")
                ++k
            }
            println()
        }
    }
}

fun main(args: Array<String>) {
    val p = Structure()
    p createPyramid 4       // p.createPyramid(4)
}

When you run the program, the output will be:

      * 
    * * * 
  * * * * * 
* * * * * * * 

Here, createPyramid() is an infix function that creates a pyramid structure. It is a member function of class Structure, takes only one parameter of type Int, and starts with keyword infix.

The number of rows of the pyramind depends on the argument passed to the function.

Kotlin Functions

In this article, you’ll learn about functions; what functions are, its syntax and how to create a user-function in Kotlin.

In programming, function is a group of related statements that perform a specific task.

Functions are used to break a large program into smaller and modular chunks. For example, you need to create and color a circle based on input from the user. You can create two functions to solve this problem:

  • createCircle() Function
  • colorCircle() Function

Dividing a complex program into smaller components makes our program more organized and manageable.

Furthermore, it avoids repetition and makes code reusable.


Types of Functions

Depending on whether a function is defined by the user, or available in standard library, there are two types of functions:

  • Kotlin Standard Library Function
  • User-defined functions

Kotlin Standard Library Function

The standard library functions are built-in functions in Kotlin that are readily available for use. For example,

  • print() is a library function that prints message to the standard output stream (monitor).
  • sqrt() returns square root of a number (Double value)
fun main(args: Array<String>) {

    var number = 5.5
    print("Result = ${Math.sqrt(number)}")
}

When you run the program, the output will be:

Result = 2.345207879911715

Here is a link to the Kotlin Standard Library for you to explore.


User-defined Functions

As mentioned, you can create functions yourself. Such functions are called user-defined functions.


How to create a user-defined function in Kotlin?

Before you can use (call) a function, you need to define it.

Here’s how you can define a function in Kotlin:

fun callMe() {
    // function body
}

To define a function in Kotlin, fun keyword is used. Then comes the name of the function (identifier). Here, the name of the function is callMe.

In the above program, the parenthesis ( ) is empty. It means, this function doesn’t accept any argument. You will learn about arguments later in this article.

The codes inside curly braces { } is the body of the function.


How to call a function?

You have to call the function to run codes inside the body of the function. Here’s how:

callme()

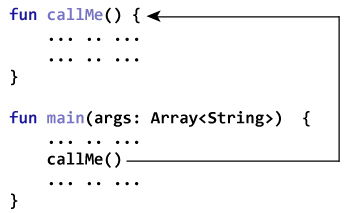
This statement calls the callMe() function declared earlier.

Function call in Koltin

Example: Simple Function Program

fun callMe() {
    println("Printing from callMe() function.")
    println("This is cool (still printing from inside).")
}

fun main(args: Array<String>) {
    callMe()
    println("Printing outside from callMe() function.")
}

When you run the program, the output will be:

Printing from callMe() function.
This is cool (still printing from inside).
Printing outside from callMe() function.

The callMe() function in the above code doesn’t accept any argument.

Also, the function doesn’t return any value (return type is Unit).

Let’s take another function example. This function will accept arguments and also returns a value.


Example: Add Two Numbers Using Function

fun addNumbers(n1: Double, n2: Double): Int {
    val sum = n1 + n2
    val sumInteger = sum.toInt()
    return sumInteger
}

fun main(args: Array<String>) {
    val number1 = 12.2
    val number2 = 3.4
    val result: Int

    result = addNumbers(number1, number2)
    println("result = $result")
}

When you run the program, the output will be:

result = 15

How functions with arguments and return value work?

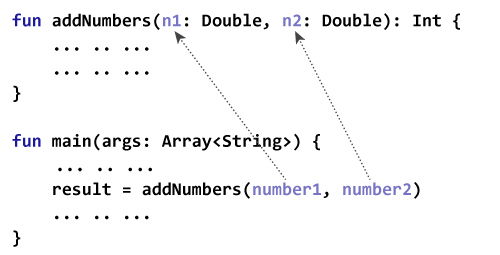
Here, two arguments number1 and number2 of type Double are passed to the addNumbers() function during function call. These arguments are called actual arguments.

result = addNumbers(number1, number2)

The parameters n1 and n2 accepts the passed arguments (in the function definition). These arguments are called formal arguments (or parameters).

Passing arguments to a function in Kotlin

In Kotlin, arguments are separated using commas. Also, the type of the formal argument must be explicitly typed.

Note that, the data type of actual and formal arguments should match, i.e., the data type of first actual argument should match the type of first formal argument. Similarly, the type of second actual argument must match the type of second formal argument and so on.


Here,

return sumInteger

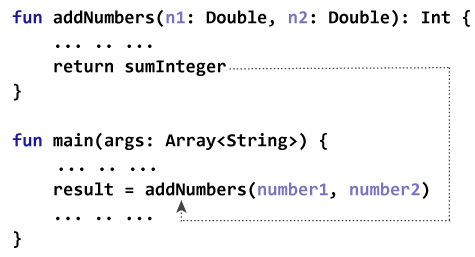
is the return statement. This code terminates the addNumbers() function, and control of the program jumps to the main() function.

In the program, sumInteger is returned from addNumbers() function. This value is assigned to the variable result.

Return value from a function in Kotlin

Notice,

  • both sumInteger and result are of type Int.
  • the return type of the function is specified in the function definition.// return type is Int fun addNumbers(n1: Double, n2: Double): Int { … .. … }

If the function doesn’t return any value, its return type is Unit. It is optional to specify the return type in the function definition if the return type is Unit.


Example: Display Name by Using Function

fun main(args: Array<String>) {
    println(getName("John", "Doe"))
}

fun getName(firstName: String, lastName: String): String = "$firstName $lastName"

When you run the program, the output will be:

John Doe

Here, the getName() function takes two String arguments, and returns a String.

You can omit the curly braces { } of the function body and specify the body after = symbol if the function returns a single expression (like above example).

It is optional to explicitly declare the return type in such case because the return type can be inferred by the compiler. In the above example, you can replace

fun getName(firstName: String, lastName: String): String = "$firstName $lastName"

with

fun getName(firstName: String, lastName: String) = "$firstName $lastName"

Kotlin continue Expression

In this tutorial, you will learn to use continue to skip the current iteration of a loop. Also, you will also learn about continue labels in this article.

Suppose you are working with loops. It is sometimes desirable to skip the current iteration of the loop.

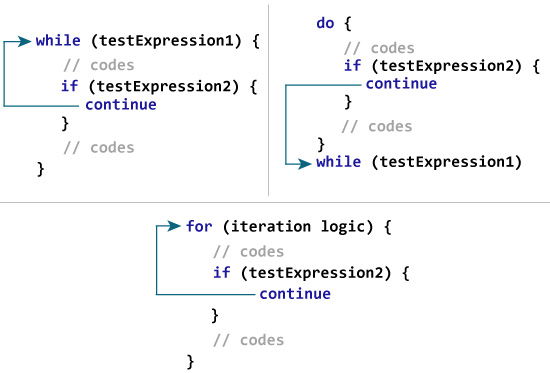
In such case, continue is used. The continue construct skips the current iteration of the enclosing loop, and the control of the program jumps to the end of the loop body.


How continue works?

It is almost always used with if…else construct. For example,

while (testExpression1) {

    // codes1
    if (testExpression2) {
        continue
    }
    // codes2
}

If the testExpression2 is evaluated to truecontinue is executed which skips all the codes inside while loop after it for that iteration.

How continue expression works in Kotlin?

Example: Kotlin continue

fun main(args: Array<String>) {

    for (i in 1..5) {
        println("$i Always printed.")
        if (i > 1 && i < 5) {
            continue
        }
        println("$i Not always printed.")
    }
}

When you run the program, the output will be:

1 Always printed.
1 Not always printed.
2 Always printed.
3 Always printed.
4 Always printed.
5 Always printed.
5 Not always printed.

When the value of i is greater than 1 and less than 5, continue is executed, which skips the execution of

println("$i Not always printed.")

statement.

However, the statement

println("$i Always printed.")

is executed in each iteration of the loop because this statement exists before the continue construct.


Example: Calculate Sum of Positive Numbers Only

The program below calculates the sum of maximum of 6 positive numbers entered by the user. If the user enters negative number or zero, it is skipped from calculation.

Visit Kotlin Basic Input Output to learn more on how to take input from the user.

fun main(args: Array<String>) {

    var number: Int
    var sum = 0

    for (i in 1..6) {
        print("Enter an integer: ")
        number = readLine()!!.toInt()

        if (number <= 0)
            continue
        
        sum += number
    }
    println("sum = $sum")
}

When you run the program, the output will be:

Enter an integer: 4
Enter an integer: 5
Enter an integer: -50
Enter an integer: 10
Enter an integer: 0
Enter an integer: 12
sum = 31

Kotlin Labeled continue

What you have learned till now is unlabeled form of continue, which skips current iteration of the nearest enclosing loop. continue can also be used to skip the iteration of the desired loop (can be outer loop) by using continue labels.


How labeled continue works?

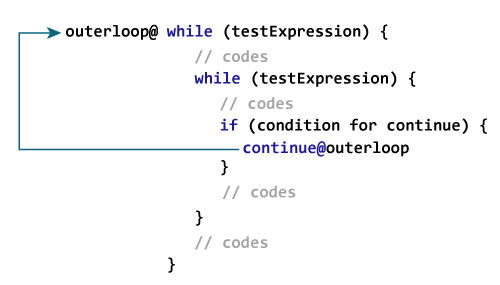
How labeled continue works?

Label in Kotlin starts with an identifier which is followed by @.

Here, outerloop@ is a label marked at outer while loop. Now, by using continue with the label (continue@outerloop in this case), you can skip the execution of codes of the specific loop for that iteration.


Example: labeled continue

fun main(args: Array<String>) {

    here@ for (i in 1..5) {
        for (j in 1..4) {
            if (i == 3 || j == 2)
                continue@here
            println("i = $i; j = $j")
        }
    }
}

When you run the program, the output will be:

i = 1; j = 1
i = 2; j = 1
i = 4; j = 1
i = 5; j = 1

The use of labeled continue is often discouraged as it makes your code hard to understand. If you are in a situation where you have to use labeled continue, refactor your code and try to solve it in a different way to make it more readable.


There are 3 structural jump expressions in Kotlin: breakcontinue and return.

Kotlin break Expression

In this tutorial, you will learn to use break to terminate a loop. Also, you will also learn about break labels.

Suppose you are working with loops. It is sometimes desirable to terminate the loop immediately without checking the test expression.

In such case, break is used. It terminates the nearest enclosing loop when encountered (without checking the test expression). This is similar to how break statement works in Java.


How break works?

It is almost always used with if..else construct. For example,

for (...) {
    if (testExpression) {
        break
    }
}

If testExpression is evaluated to truebreak is executed which terminates the for loop.


Example: Kotlin break

fun main(args: Array<String>) {

    for (i in 1..10) {
        if (i == 5) {
            break
        }
        println(i)
    }
}

When you run the program, the output will be:

1
2
3
4

When the value of i is equal to 5, expression i == 5 inside if is evaluated to true, and break is executed. This terminates the for loop.


Example: Calculate Sum Until User enters 0

The program below calculates the sum of numbers entered by the user until user enters 0.

Visit Kotlin Basic Input Output to learn more on how to take input from the user.

fun main(args: Array<String>) {

    var sum = 0
    var number: Int

    while (true) {
        print("Enter a number: ")
        number = readLine()!!.toInt()

        if (number == 0)
            break

        sum += number
    }

    print("sum = $sum")
}

When you run the program, the output will be:

Enter a number: 4
Enter a number: 12
Enter a number: 6
Enter a number: -9
Enter a number: 0
sum = 13

In the above program, the test expression of the while loop is always true.

Here, the while loop runs until user enters 0. When user inputs 0, break is executed which terminates the while loop.


Kotlin Labeled break

What you have learned till now is unlabeled form of break, which terminates the nearest enclosing loop. There is another way break can be used (labeled form) to terminate the desired loop (can be outer loop).


How labeled break works?

Label in Kotlin starts with an identifier which is followed by @.

Here, test@ is a label marked at the outer while loop. Now, by using break with a label (break@test in this case), you can break the specific loop.

Here’s an example:

fun main(args: Array<String>) {

    first@ for (i in 1..4) {

        second@ for (j in 1..2) {
            println("i = $i; j = $j")

            if (i == 2)
                break@first
        }
    }
}

When you run the program, the output will be:

i = 1; j = 1
i = 1; j = 2
i = 2; j = 1

Here, when i == 2 expression is evaluated to truebreak@first is executed which terminates the loop marked with label first@.


Here’s a little variation of the above program.

In the program below, break terminates the loop marked with label @second.

fun main(args: Array<String>) {

    first@ for (i in 1..4) {

        second@ for (j in 1..2) {
            println("i = $i; j = $j")

            if (i == 2)
                break@second
        }
    }
}

When you run the program, the output will be:

i = 1; j = 1
i = 1; j = 2
i = 2; j = 1
i = 3; j = 1
i = 3; j = 2
i = 4; j = 1
i = 4; j = 2

Note: Since, break is used to terminate the innermost loop in this program, it is not necessary to use labeled break in this case.


There are 3 structural jump expressions in Kotlin: breakcontinue and return.