Kotlin Introduction
- Kotlin Hello World
- Kotlin Data Types
- Kotlin Operators
- Kotlin Type Conversion
- Kotlin Expression & Statement
- Kotlin Comments
- Kotlin Input/Output
Kotlin Flow Control
- Kotlin if expression
- Kotlin when Expression
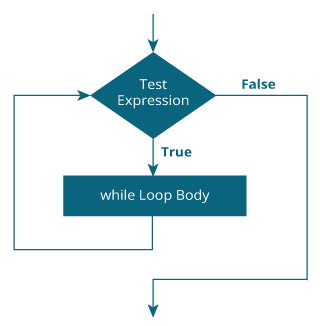
- Kotlin while Loop
- Kotlin for Loop
- Kotlin break
- Kotlin continue
Kotlin Functions
Kotlin OOP
- Kotlin Class and Objects
- Kotlin Constructors
- Kotlin Getters and Setters
- Kotlin Inheritance
- Kotlin Visibility Modifiers
- Kotlin Abstract Class
- Kotlin Interfaces
- Kotlin Nested and Inner Classes
- Kotlin Data Class
- Kotlin Sealed Class
- Kotlin Object
- Kotlin Companion Objects
- Kotlin Extension Function
- Kotlin Operator Overloading
In this article, you will learn to create data classes in Kotlin. You will also learn about requirements that data class must fulfill, and their standard functionalities.
There may arise a situation where you need to create a class solely to hold data. In such cases, you can mark the class as data to create a data class. For example,
data class Person(val name: String, var age: Int)
For this class, the compiler automatically generates:
copy()function,equals()andhashCode()pair, andtoString()form of the primary constructorcomponentN()functions
Before talking about these features in detail, let’s talk about requirements that a data class must fulfill.
Kotlin Data Class Requirements
Here are the requirements:
- The primary constructor must have at least one parameter.
- The parameters of the primary constructor must be marked as either
val(read-only) orvar(read-write). - The class cannot be open, abstract, inner or sealed.
- The class may extend other classes or implement interfaces. If you are using Kotlin version before 1.1, the class can only implement interfaces.
Example: Kotlin Data Class
data class User(val name: String, val age: Int)

fun main(args: Array<String>) {
    val jack = User("jack", 29)
    println("name = ${jack.name}")
    println("age = ${jack.age}")
}
When you run the program, the output will be:
name = jack
age = 29
When you declare a data class, the compiler automatically generates several functions such as toString(), equals(), hashcode() etc behind the scenes. This helps to keep you code concise. Had you used Java, you would need to write a lot of boilerplate code.
Let’s use these functions:
Copying
For a data class, you can create a copy of an object with some of its properties different using copy() function. Here’s how it works:
data class User(val name: String, val age: Int)

fun main(args: Array<String>) {
    val u1 = User("John", 29)

    // using copy function to create an object
    val u2 = u1.copy(name = "Randy")

    println("u1: name = ${u1.name}, name = ${u1.age}")
    println("u2: name = ${u2.name}, name = ${u2.age}")
}
When you run the program, the output will be:
u1: name = John, name = 29
u2: name = Randy, name = 29
toString() method
The toString() function returns a string representation of the object.
data class User(val name: String, val age: Int)

fun main(args: Array<String>) {
    val u1 = User("John", 29)
    println(u1.toString())
}
When you run the program, the output will be:
User(name=John, age=29)
hashCode() and equals()
The hasCode() method returns hash code for the object. If two objects are equal, hashCode() produces the same integer result.
The equals() returns true if two objects are equal (has same hashCode()). If objects are not equal, equals() returns false.
data class User(val name: String, val age: Int)

fun main(args: Array<String>) {
    val u1 = User("John", 29)
    val u2 = u1.copy()
    val u3 = u1.copy(name = "Amanda")

    println("u1 hashcode = ${u1.hashCode()}")
    println("u2 hashcode = ${u2.hashCode()}")
    println("u3 hashcode = ${u3.hashCode()}")

    if (u1.equals(u2) == true)
        println("u1 is equal to u2.")
    else
        println("u1 is not equal to u2.")

    if (u1.equals(u3) == true)
        println("u1 is equal to u3.")
    else
        println("u1 is not equal to u3.")
}
When you run the program, the output will be:
u1 hashcode = 71750738
u2 hashcode = 71750738
u3 hashcode = 771732263
u1 is equal to u2.
u1 is not equal to u3.
Destructuring Declarations
You can destructure an object into a number of variables using destructing declaration. For example:
data class User(val name: String, val age: Int, val gender: String)

fun main(args: Array<String>) {
    val u1 = User("John", 29, "Male")

    val (name, age, gender) = u1
    println("name = $name")
    println("age = $age")
    println("gender = $gender")
}
When you run the program, the output will be:
name = John
age = 29
gender = Male
This was possible because the compiler generates componentN() functions all properties for a data class. For example:
data class User(val name: String, val age: Int, val gender: String)

fun main(args: Array<String>) {
    val u1 = User("John", 29, "Male")

    println(u1.component1())     // John
    println(u1.component2())     // 29
    println(u1.component3())     // "Male"
}
When you run the program, the output will be:
John
29
Male